📖 User Guide
Mighty School is a complete School Management System. Every feature is run from the
web Admin Panel (accessed from a browser at your site's domain, e.g.
https://yoursite.com/sign-in), organized into the modules listed in the left
sidebar. This guide covers each module in the order it appears in the sidebar.
Before you start
Every screen shows the active Branch and Session at the top
right — set both correctly before entering data, since lists, reports, and dashboards are all
scoped to whichever branch and session are currently selected.
Step 1: Login
- Open a web browser and go to your Mighty School Admin Panel URL (e.g.
https://yoursite.com/sign-in).
- Enter your Admin Email and Password, then click Login.
- Choose the correct Branch and academic Session from the top-right dropdowns.
Full Feature List
The Admin Panel sidebar groups every feature into the following modules:
- Dashboard — At-a-glance summary cards, charts, and recent activity for the institute.
- Students Information — Student admission, profiles, categories, and ID cards.
- Staffs Information — Teacher and staff profiles, staff attendance.
- Student Attendance — Daily attendance, exam attendance, attendance reports, absent fines.
- QR Code Attendance — Camera-based attendance scanning using student ID QR codes.
- Academic Configuration — Academic session, shift, class, sections, groups, periods, subjects, departments.
- Fees Management — Fee setup, fee collection, waivers, paid/unpaid reports.
- Accounts Management — Ledgers, payments, receipts, contra, journal, fund transfers, chart of accounts.
- Accounting Reports — Balance sheet, trial balance, cash flow, income statement, cash summary.
- Payroll Management — Salary structure, salary assignment, salary slips, dues, advances.
- Routine Management — Class routines, syllabus, assignments, exam routines, seating plans.
- Library Management — Book catalog, members, issue/return, barcode printing.
- Exam Module — Exam setup, mark entry, results, tabulation sheets, result cards, online exams.
- Layout & Certificates — Admit cards, ID cards, certificates, and other printable layouts.
- SMS Module — SMS templates and messaging to students, parents, and staff.
- Administrator — Admin user accounts and role permissions.
- System — Core system configuration and maintenance tools.
- Master Configuration — System settings, roles, users, institutes, branches, payment gateways.
- CMS Management — Website content such as pages, news, and notices for the public site.
- WhatsApp — WhatsApp messaging integration and settings.
- Hostel Management — Hostel rooms, allocation, and resident tracking.
- Transport Management — Vehicles, routes, and student transport assignment.
- Google Meet — Schedule and join online classes via Google Meet.
- AI Assistant — In-panel AI assistant for quick help and lookups.
Step 2: Students Information
Navigate to Students Information to admit new students and manage existing
student records — profile details, class/section assignment, guardian information, student
categories, and ID cards. This is where a student's record is created before they can appear in
Attendance, Fees, or Exam screens.
Step 3: Manage Staff & Teachers
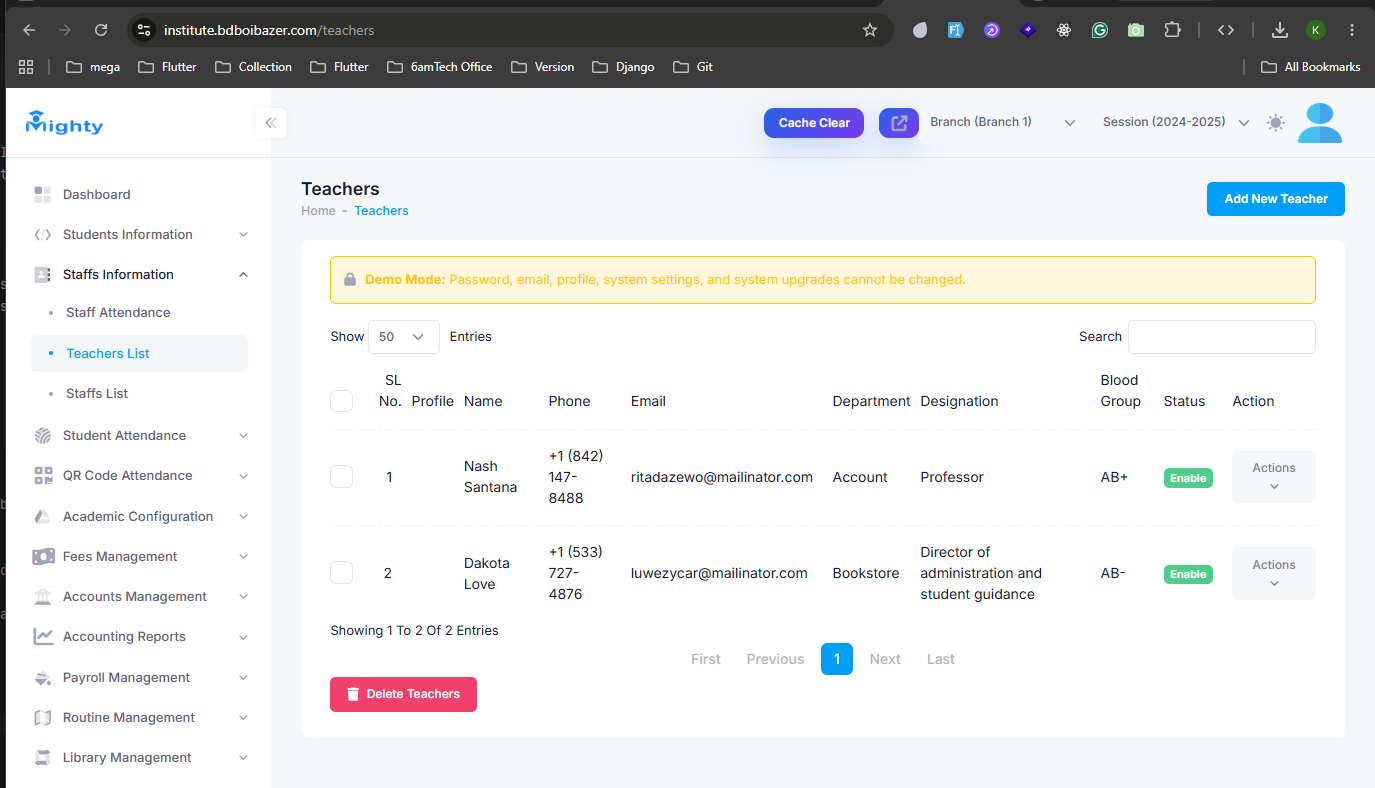
- Navigate to Staffs Information → Teachers List (or Staffs List for non-teaching staff).
- Browse each teacher's profile photo, phone, email, department, designation, and blood group, and toggle their status between Enable and Disable.
- Click Add New Teacher to register a new staff member, or use the row's Actions menu to edit or remove one. Staff Attendance, in the same menu, is used to mark daily staff attendance.
Step 4: Take Student Attendance
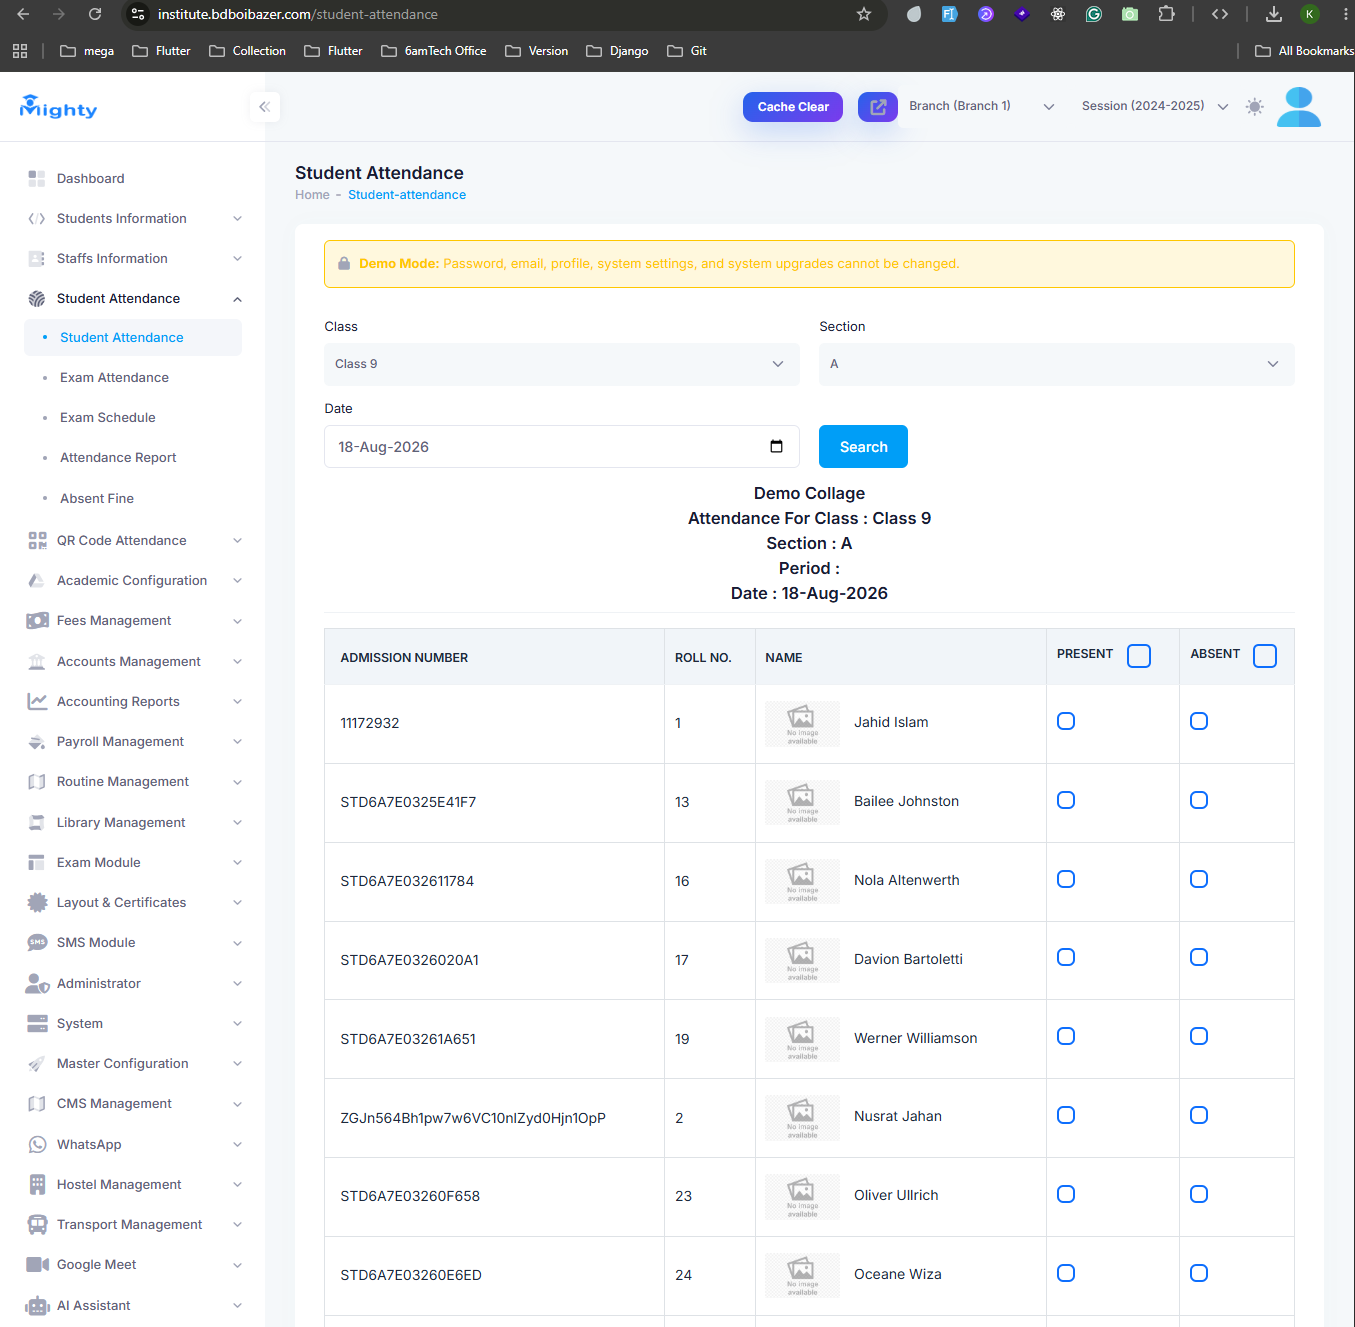
- Navigate to Student Attendance → Student Attendance.
- Select the Class, Section, and Date, then click Search to load the student list.
- Mark each student Present or Absent using the checkboxes next to their name and roll number, then save.
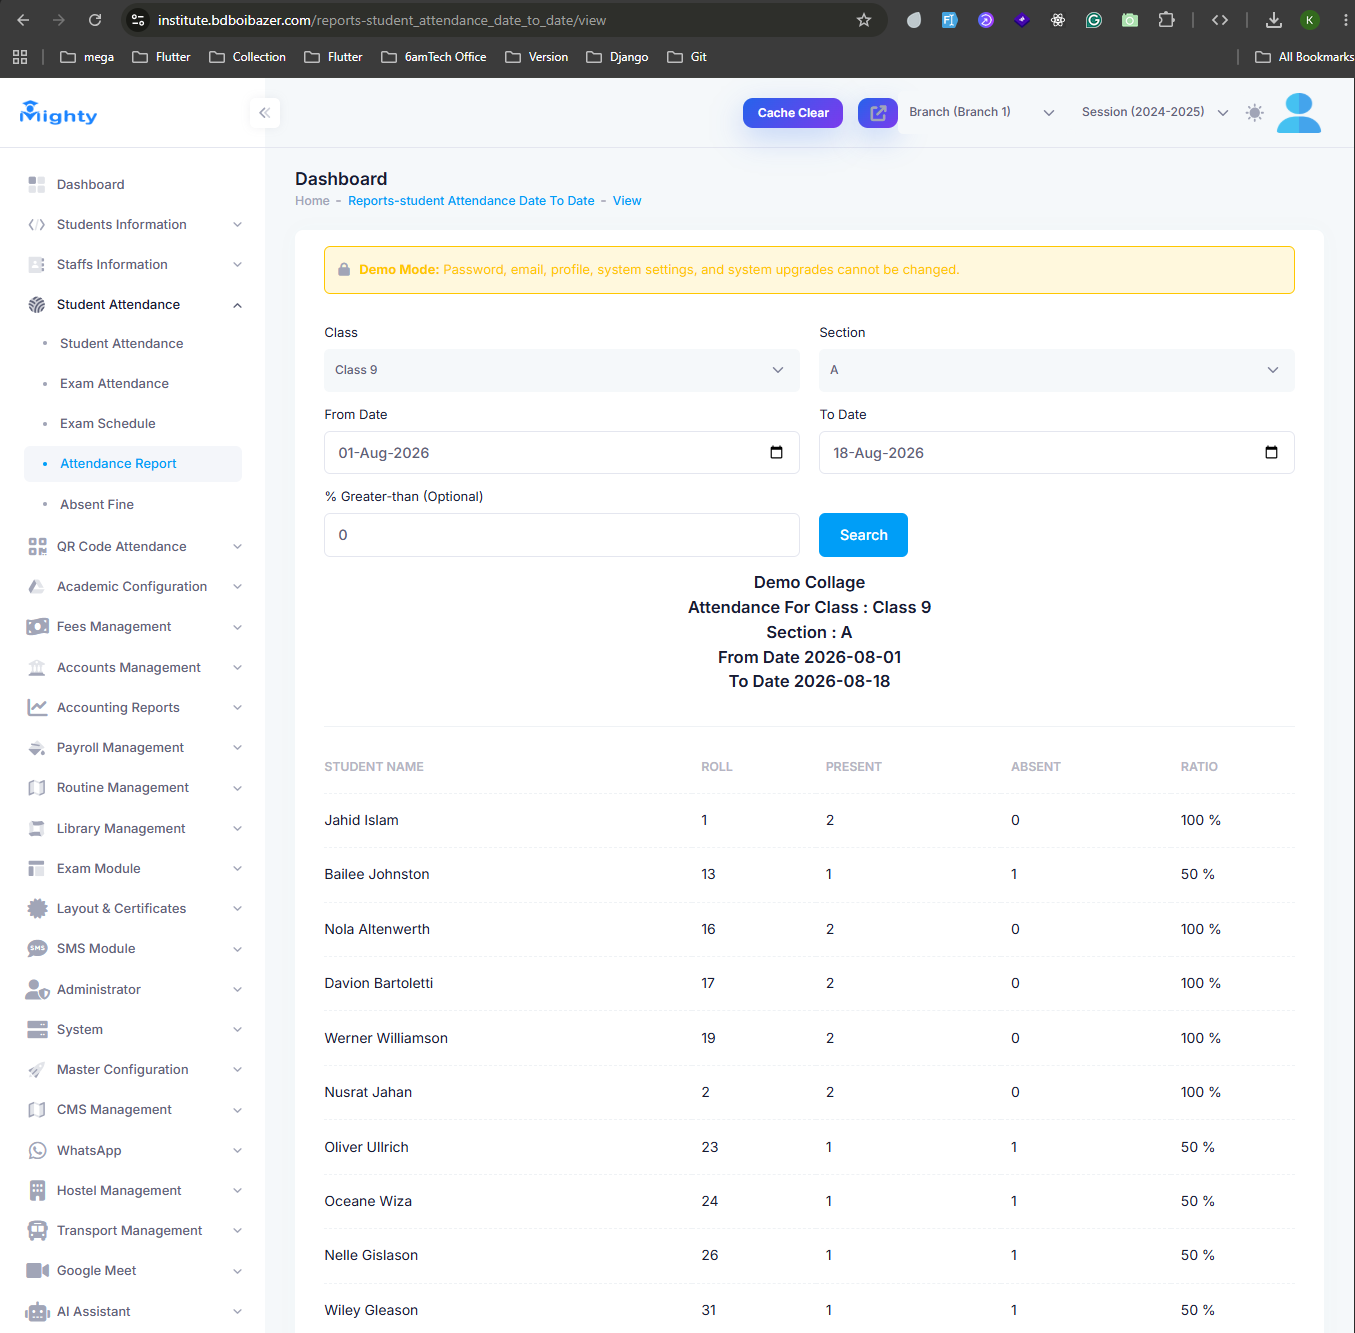
Exam Attendance and Exam Schedule, in the same menu, cover
attendance during exams. To review daily attendance afterward, open
Attendance Report, choose a class, section, and date range, and click
Search to see each student's present/absent count and attendance ratio.
Absent Fine lists any lab, quiz, or attendance-percentage fines generated from
absences.
Step 5: QR Code Attendance
For faster check-in, Mighty School can take attendance by scanning a student's ID card QR
code instead of ticking boxes manually.
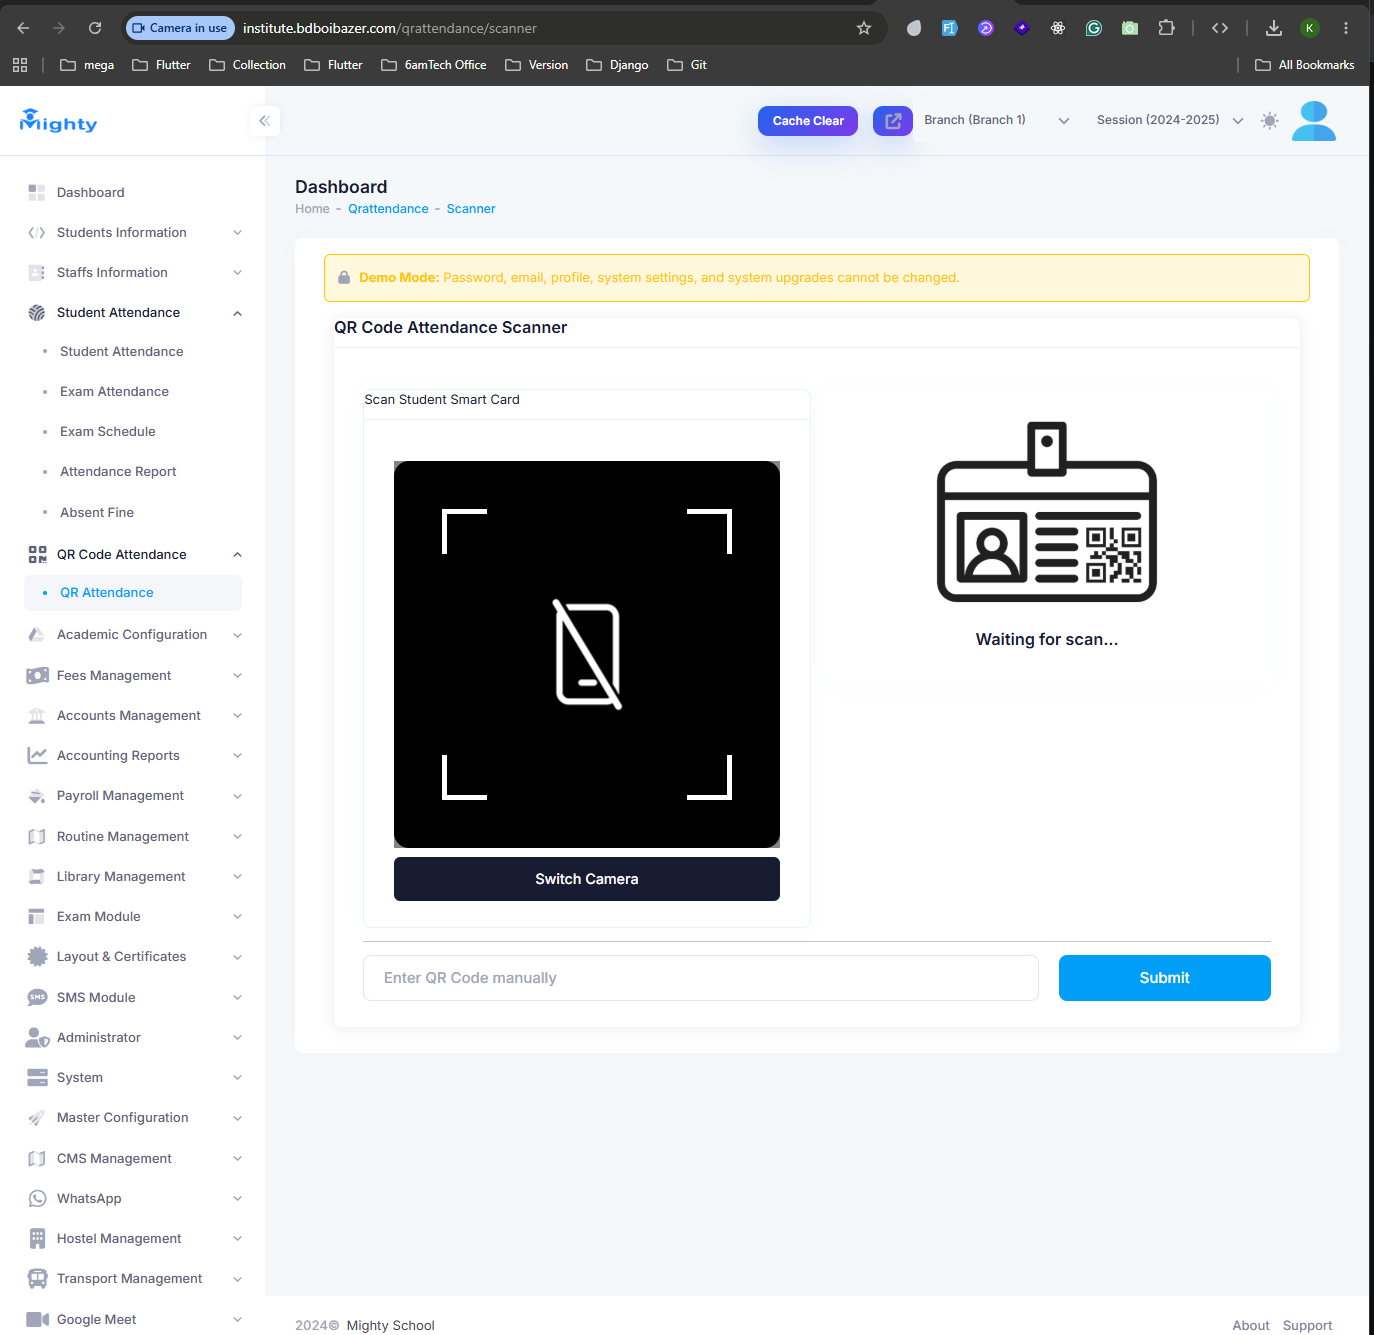
- Navigate to QR Code Attendance → QR Attendance.
- Allow the browser to access your camera when prompted.
- Scan the student's smart card, or type the code into Enter QR Code manually and click Submit if a scanner isn't available.
Step 6: Academic Configuration
Before working with classes, exams, or fees, set up the institute's core academic structure
under the Academic Configuration menu: Academic Session, Shift, Class,
Sections, Groups, Periods, Subjects, Subject Config, Departments, Student Categories, and
Picklist.
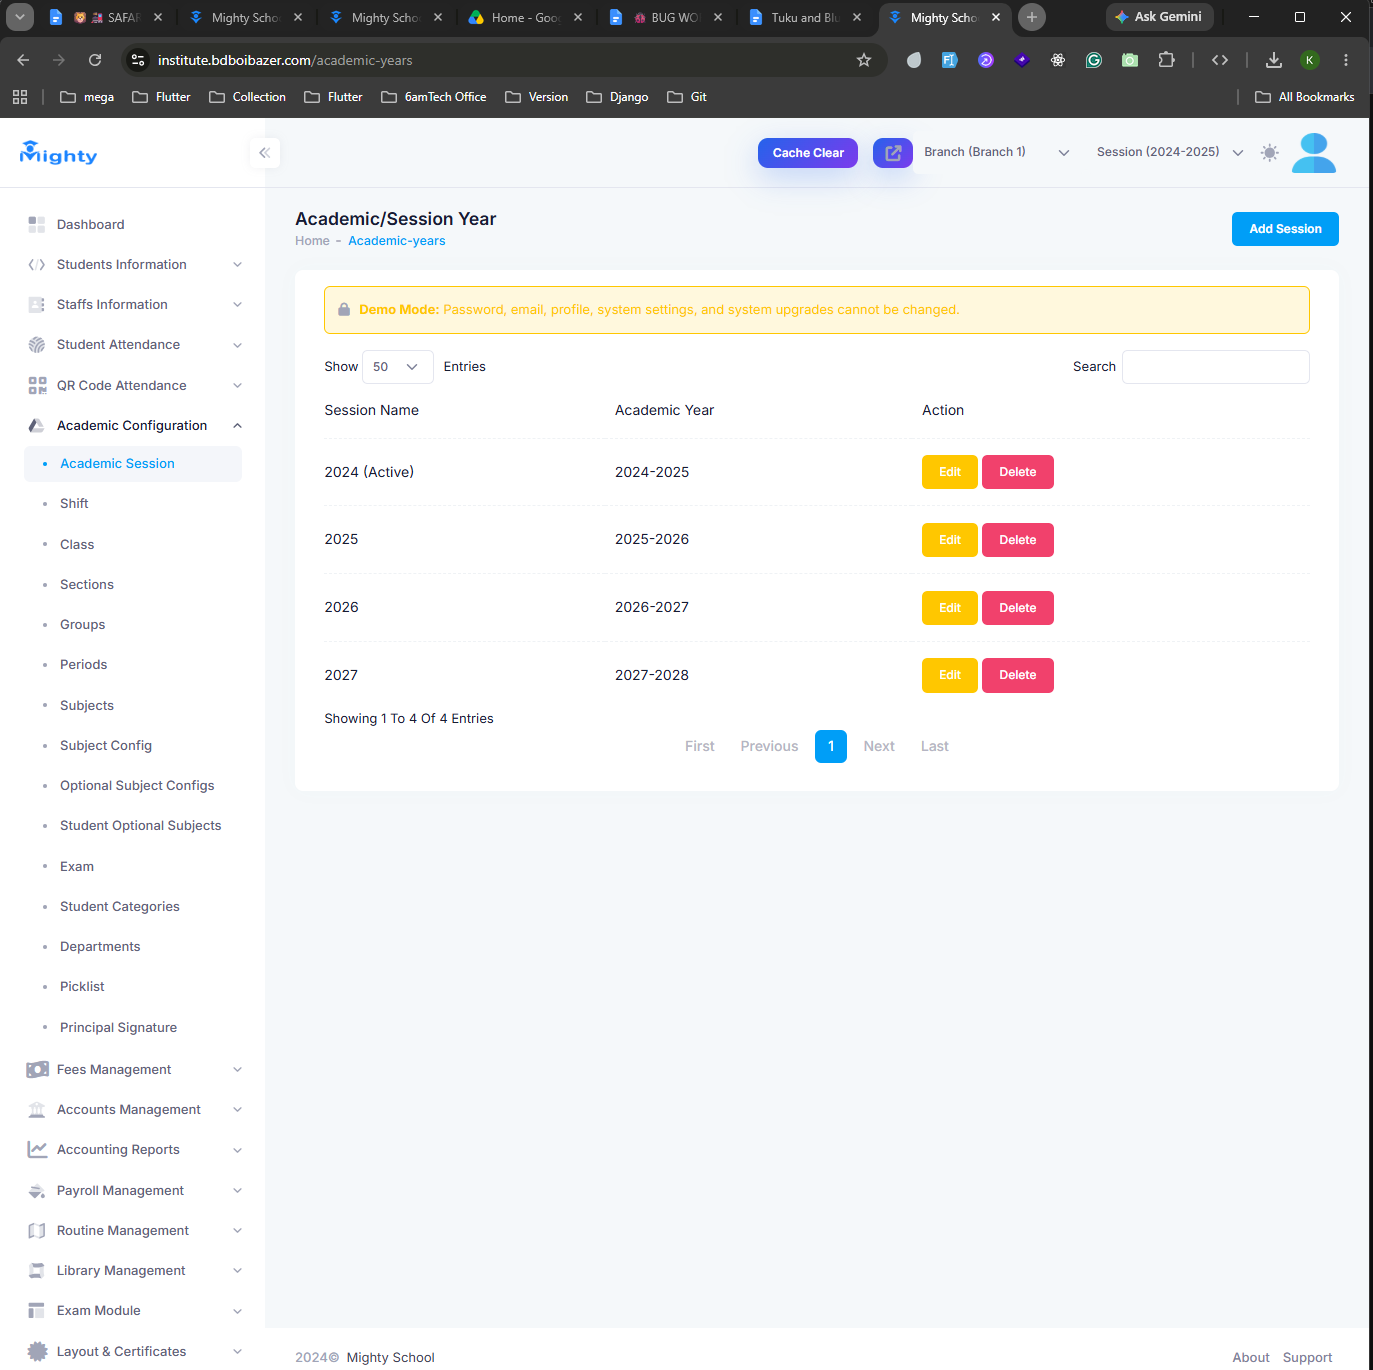
- Open Academic Configuration → Academic Session.
- Click Add Session to create a new academic year, or use Edit to update an existing one. Only one session can be Active at a time — data entry and reports use the session selected at the top of the page.
Step 7: Collect Fees
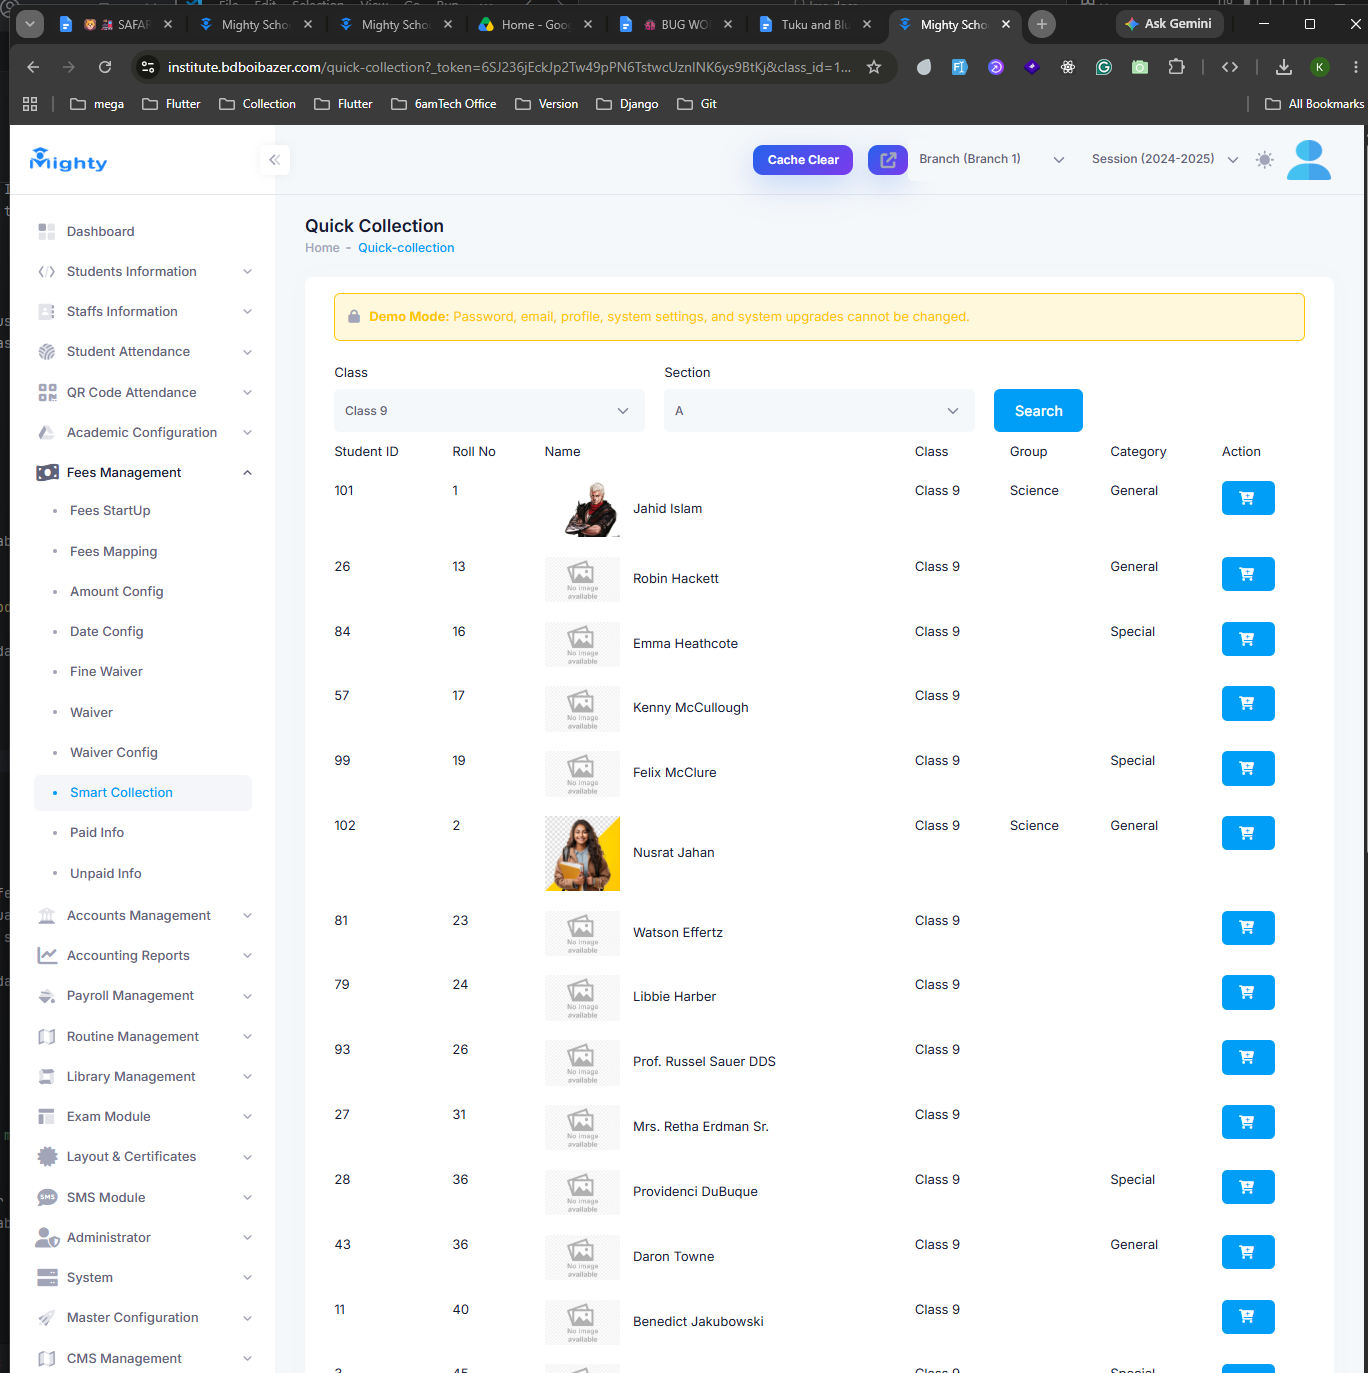
- Navigate to Fees Management → Smart Collection (Quick Collection).
- Select a Class and Section and click Search to list every student, along with their group and category.
- Click the cart icon on a student's row to open their fee items and collect payment.
The rest of the Fees Management menu handles setup and follow-up:
Fees StartUp and Fees Mapping define fee heads and assign them
to classes; Amount Config and Date Config set amounts and due
dates; Fine Waiver and Waiver apply discounts or exemptions;
and Paid Info / Unpaid Info show who has and hasn't paid.
Step 8: Accounts & Transactions
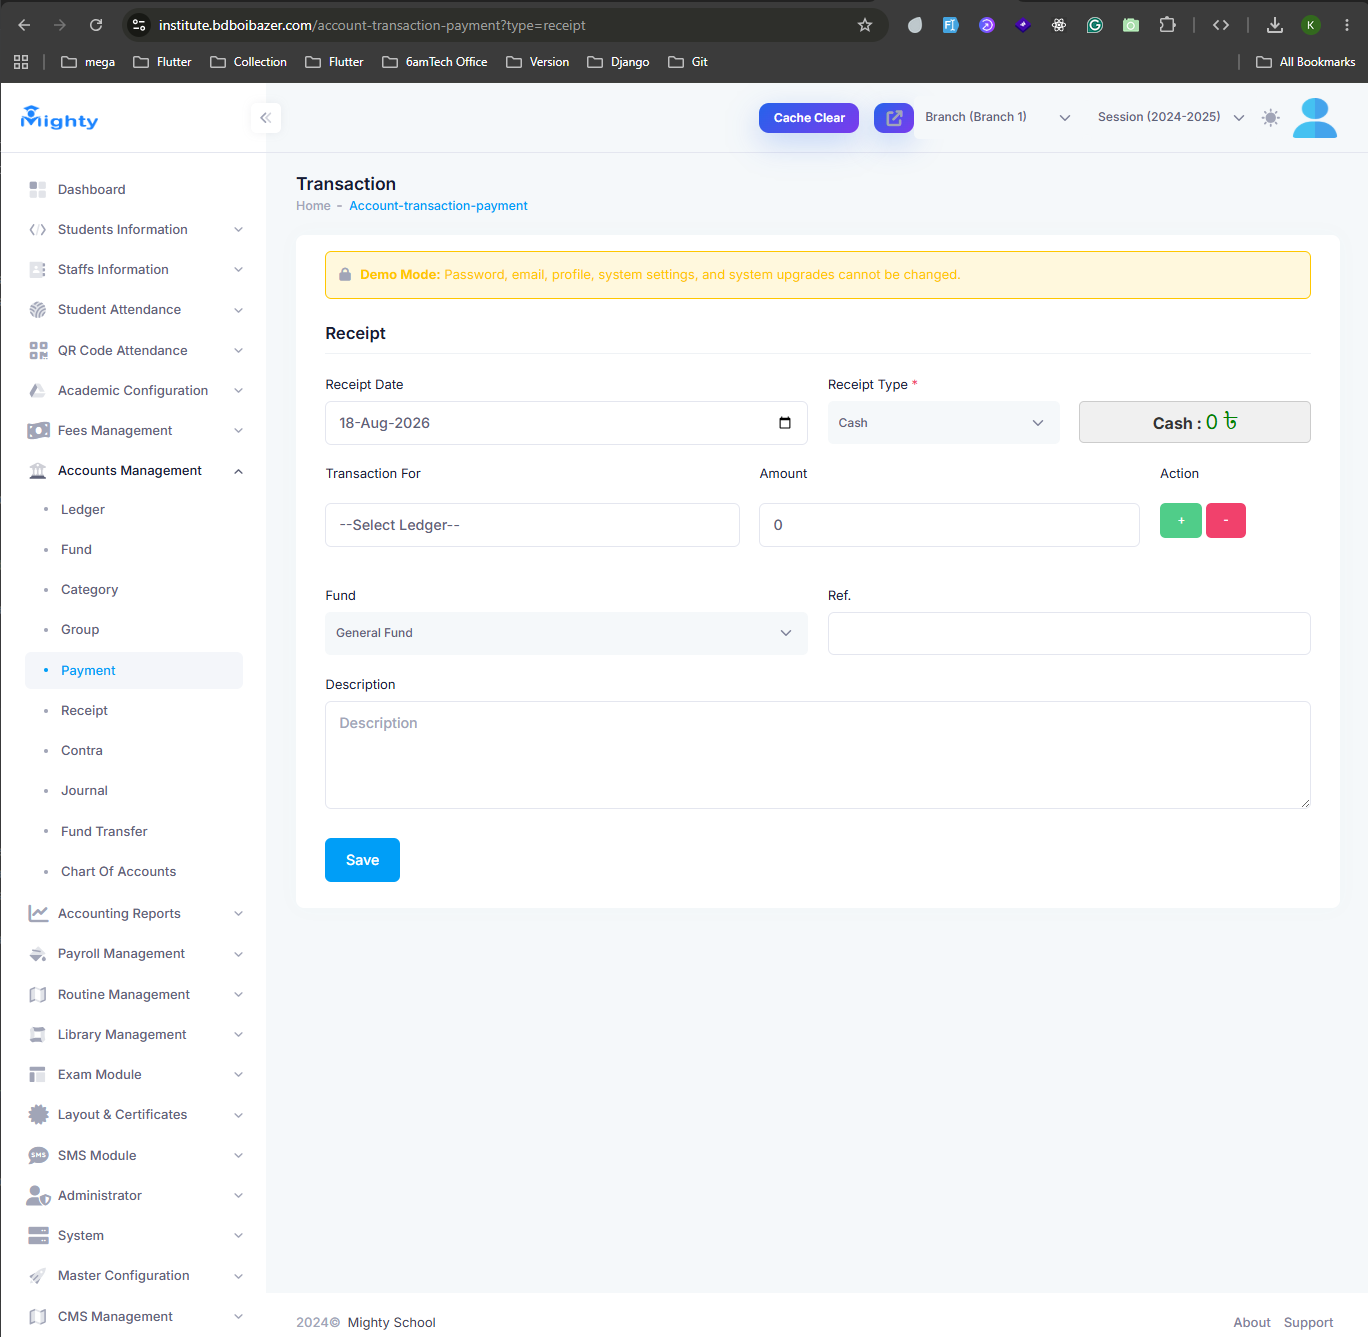
- Navigate to Accounts Management → Payment or Receipt to record money going out or coming in.
- Set the date and receipt type (e.g. Cash), choose a ledger under Transaction For, and enter the Amount, Fund, and an optional reference and description.
- Click Save to post the transaction.
Contra, Journal, and Fund Transfer cover
other transaction types, while Ledger, Fund,
Category, Group, and Chart of Accounts let
you set up the underlying accounting structure.
Step 9: Accounting Reports
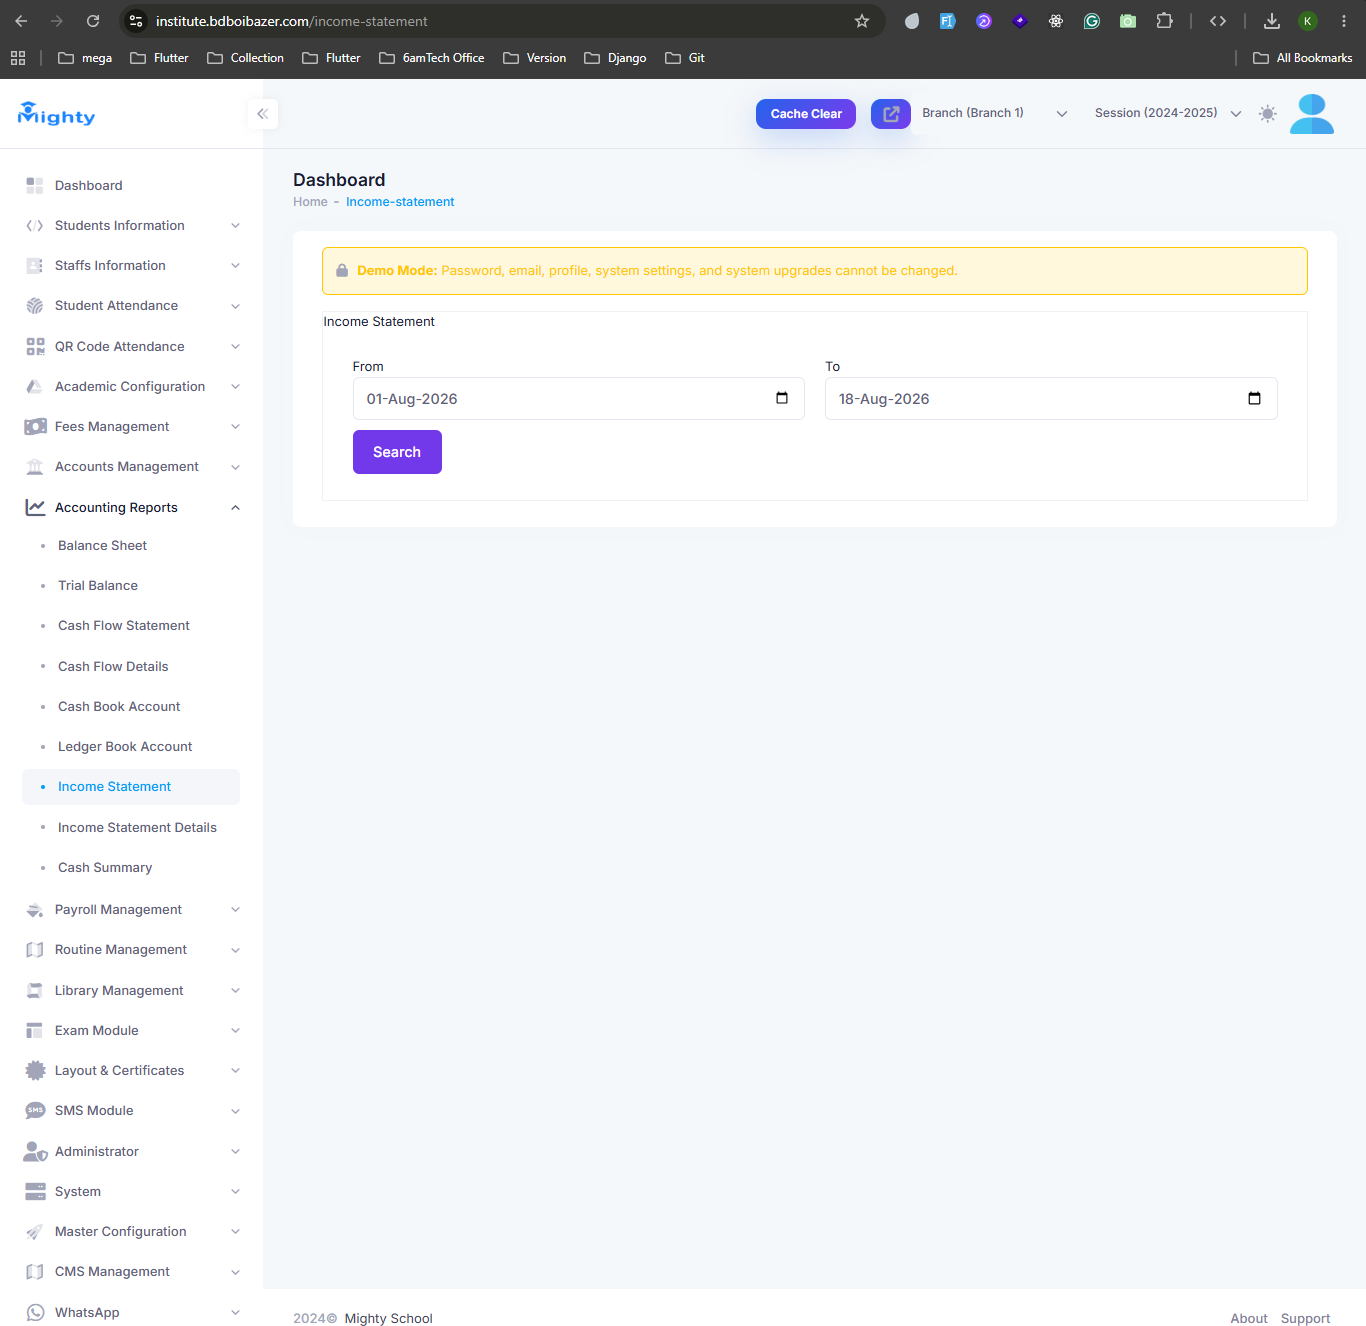
- Navigate to Accounting Reports and choose a report — Income Statement, Balance Sheet, Trial Balance, Cash Flow Statement, Cash Flow Details, Cash Book Account, Ledger Book Account, Income Statement Details, or Cash Summary.
- Set a From and To date and click Search to generate the report for that period.
Step 10: Payroll Management
- Set up salary structures first under Payroll Management → Payroll Start Up and Payroll Mapping.
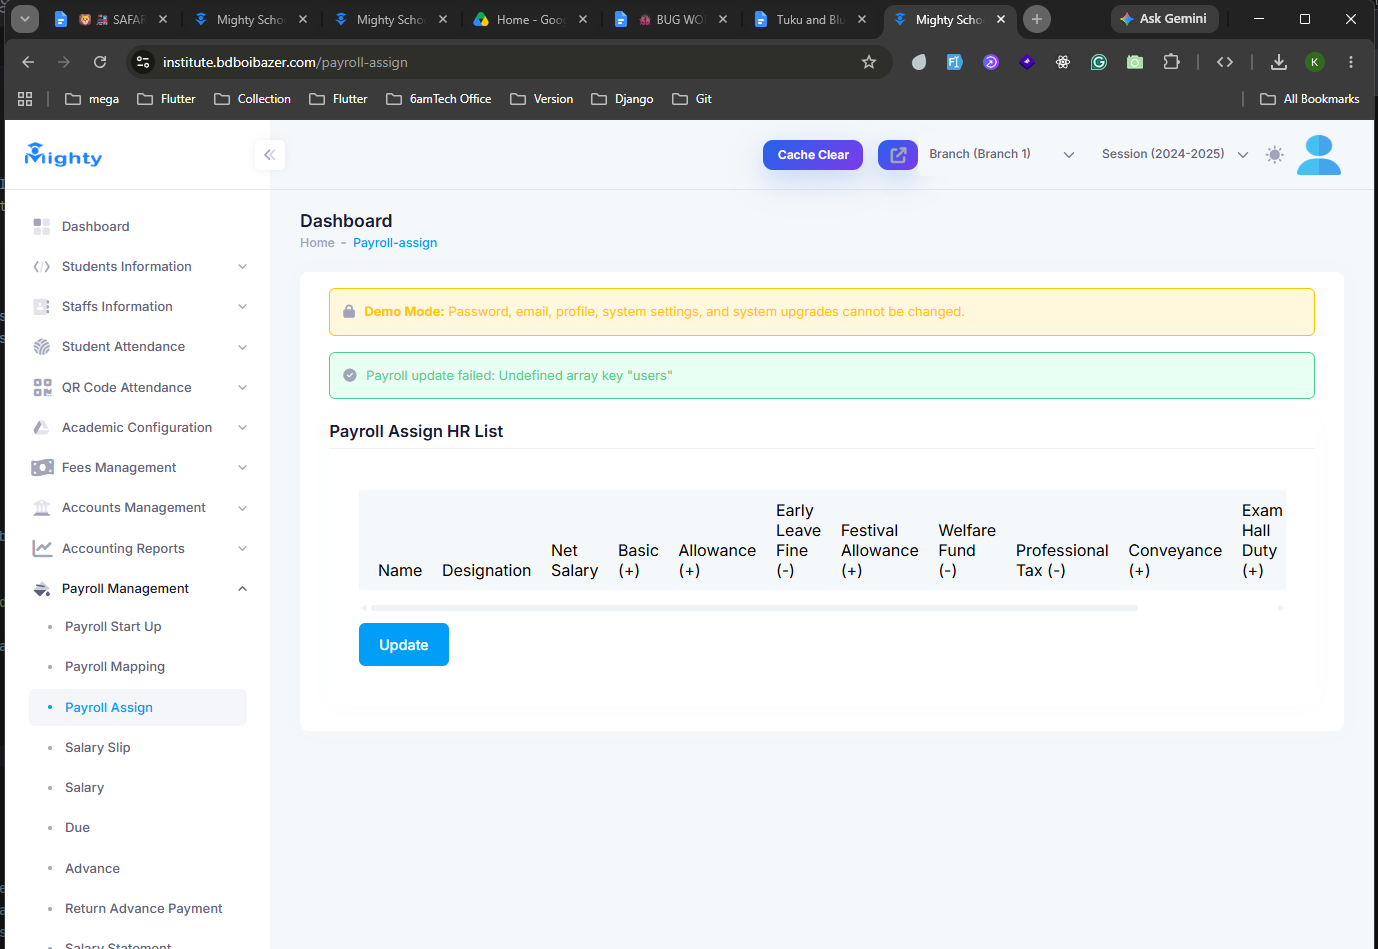
- Open Payroll Assign to review or adjust each staff member's Net Salary, Basic, Allowances, and deductions (Early Leave Fine, Welfare Fund, Professional Tax, and so on), then click Update.
- Use Salary Slip, Salary, Due, Advance, and Return Advance Payment to process monthly pay, track outstanding dues, and manage salary advances. Salary Statement pulls a summary by year and month.
Step 11: Routine Management
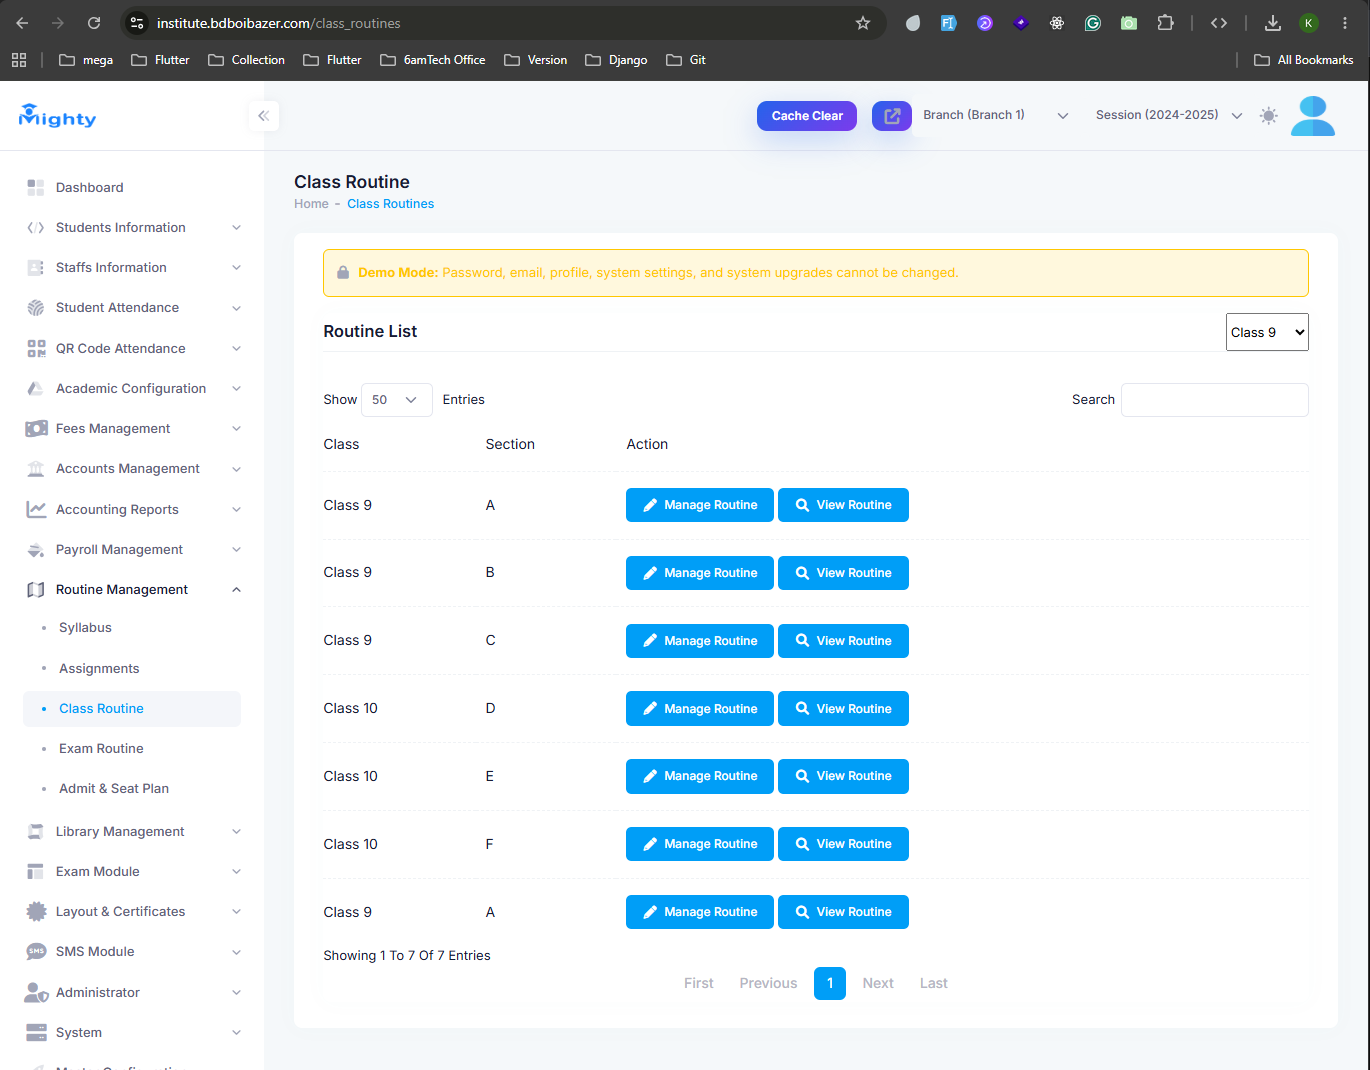
- Navigate to Routine Management → Class Routine.
- Filter the list by class, then click View Routine to see a section's schedule, or Manage Routine to edit it.
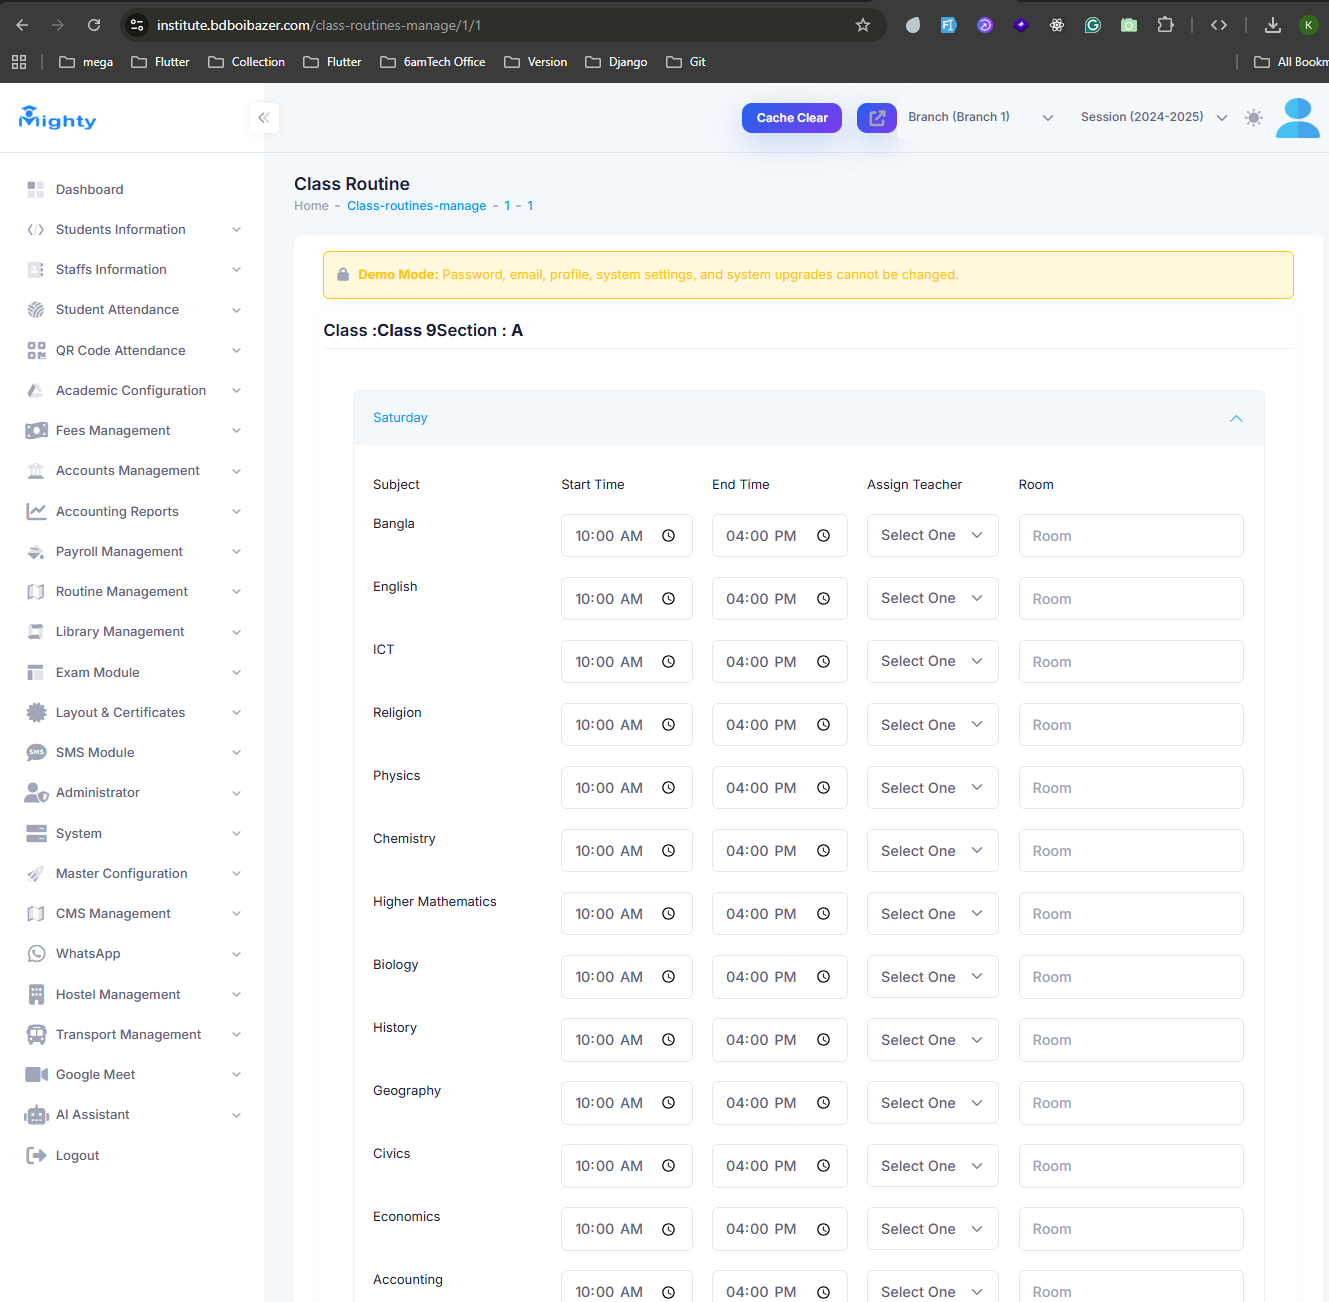
- Inside Manage Routine, each weekday is its own collapsible panel. For every subject, set the Start Time, End Time, Assign Teacher, and Room, then save.
Syllabus and Assignments, in the same menu, publish the class
syllabus and homework, while Exam Routine and Admit & Seat
Plan handle exam-day scheduling and seating.
Step 12: Library Management
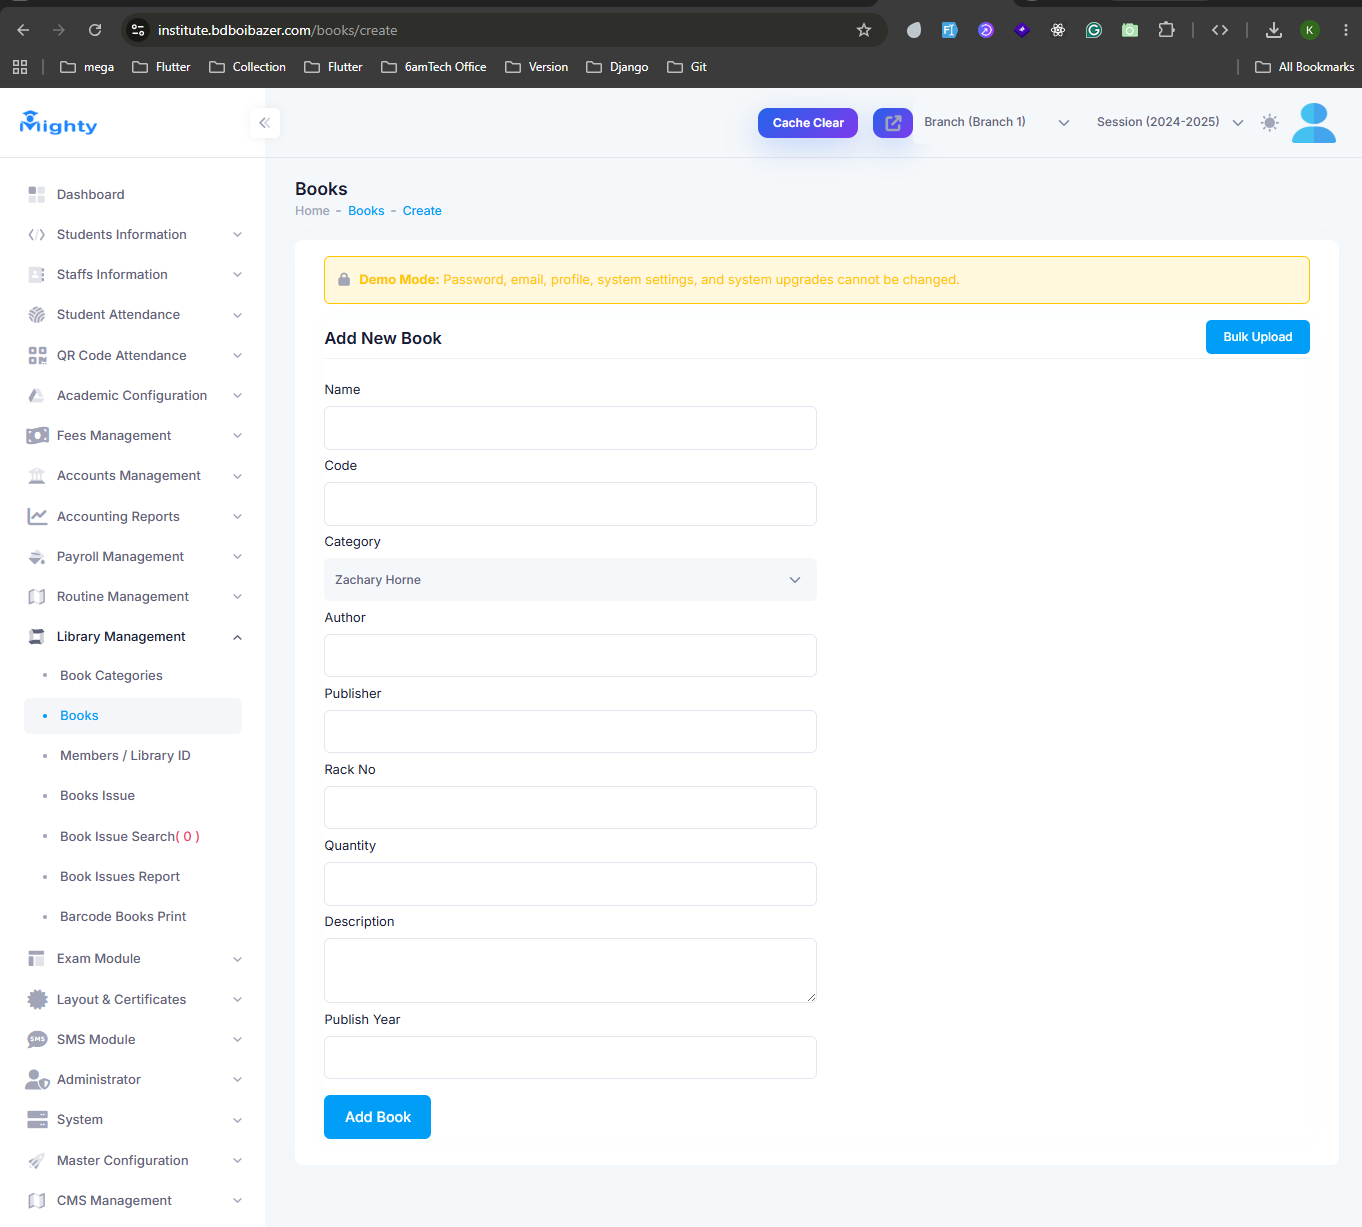
- Navigate to Library Management → Books and click Add New Book (or Bulk Upload for many books at once).
- Fill in the book's Name, Code, Category, Author, Publisher, Rack No., Quantity, and Publish Year, then click Add Book.
- Use Book Categories and Members / Library ID to manage catalog categories and library members, and Books Issue / Book Issue Search / Book Issues Report to track lending and returns. Barcode Books Print prints barcode labels for the catalog.
Step 13: Exam Module
The Exam Module covers the full exam cycle — from configuring exams to entering marks,
publishing results, and generating printable result cards, tabulation sheets, and admit cards.
Set Up an Exam
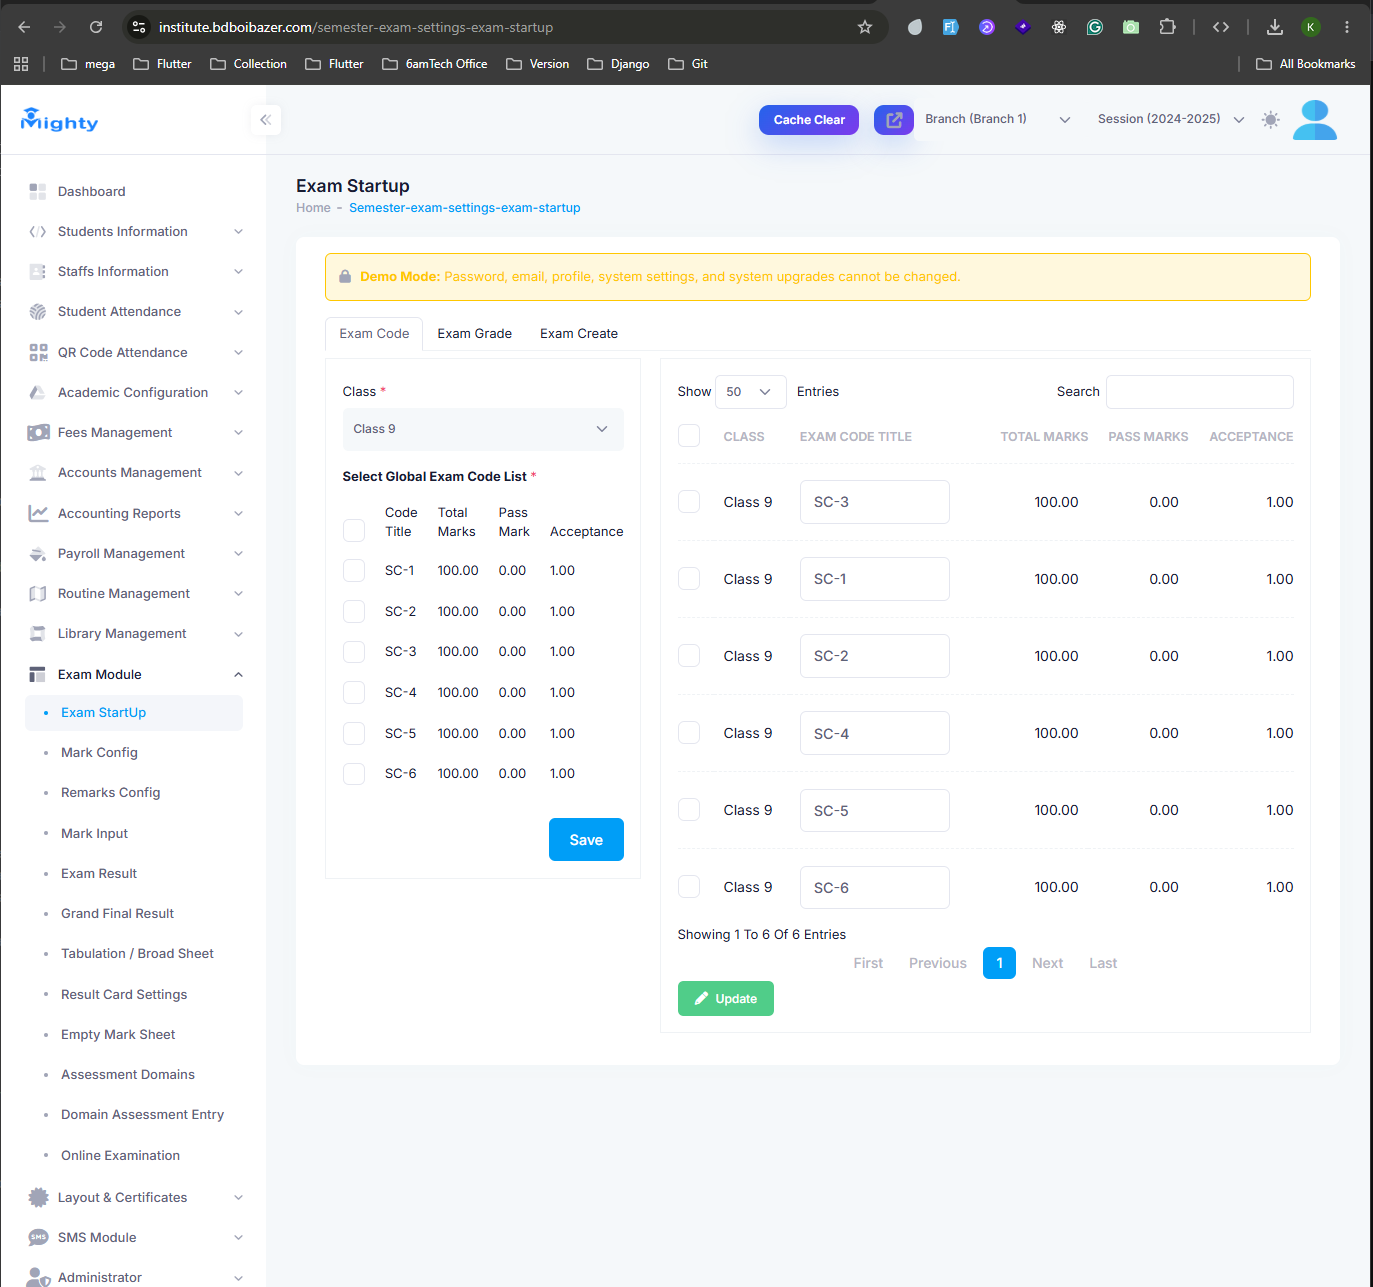
- Navigate to Exam Module → Exam StartUp.
- Select a Class, then choose which global exam codes apply to it from the Exam Code tab (each code shows its Total Marks, Pass Marks, and Acceptance ratio). The Exam Grade and Exam Create tabs configure grading scales and create the exam itself.
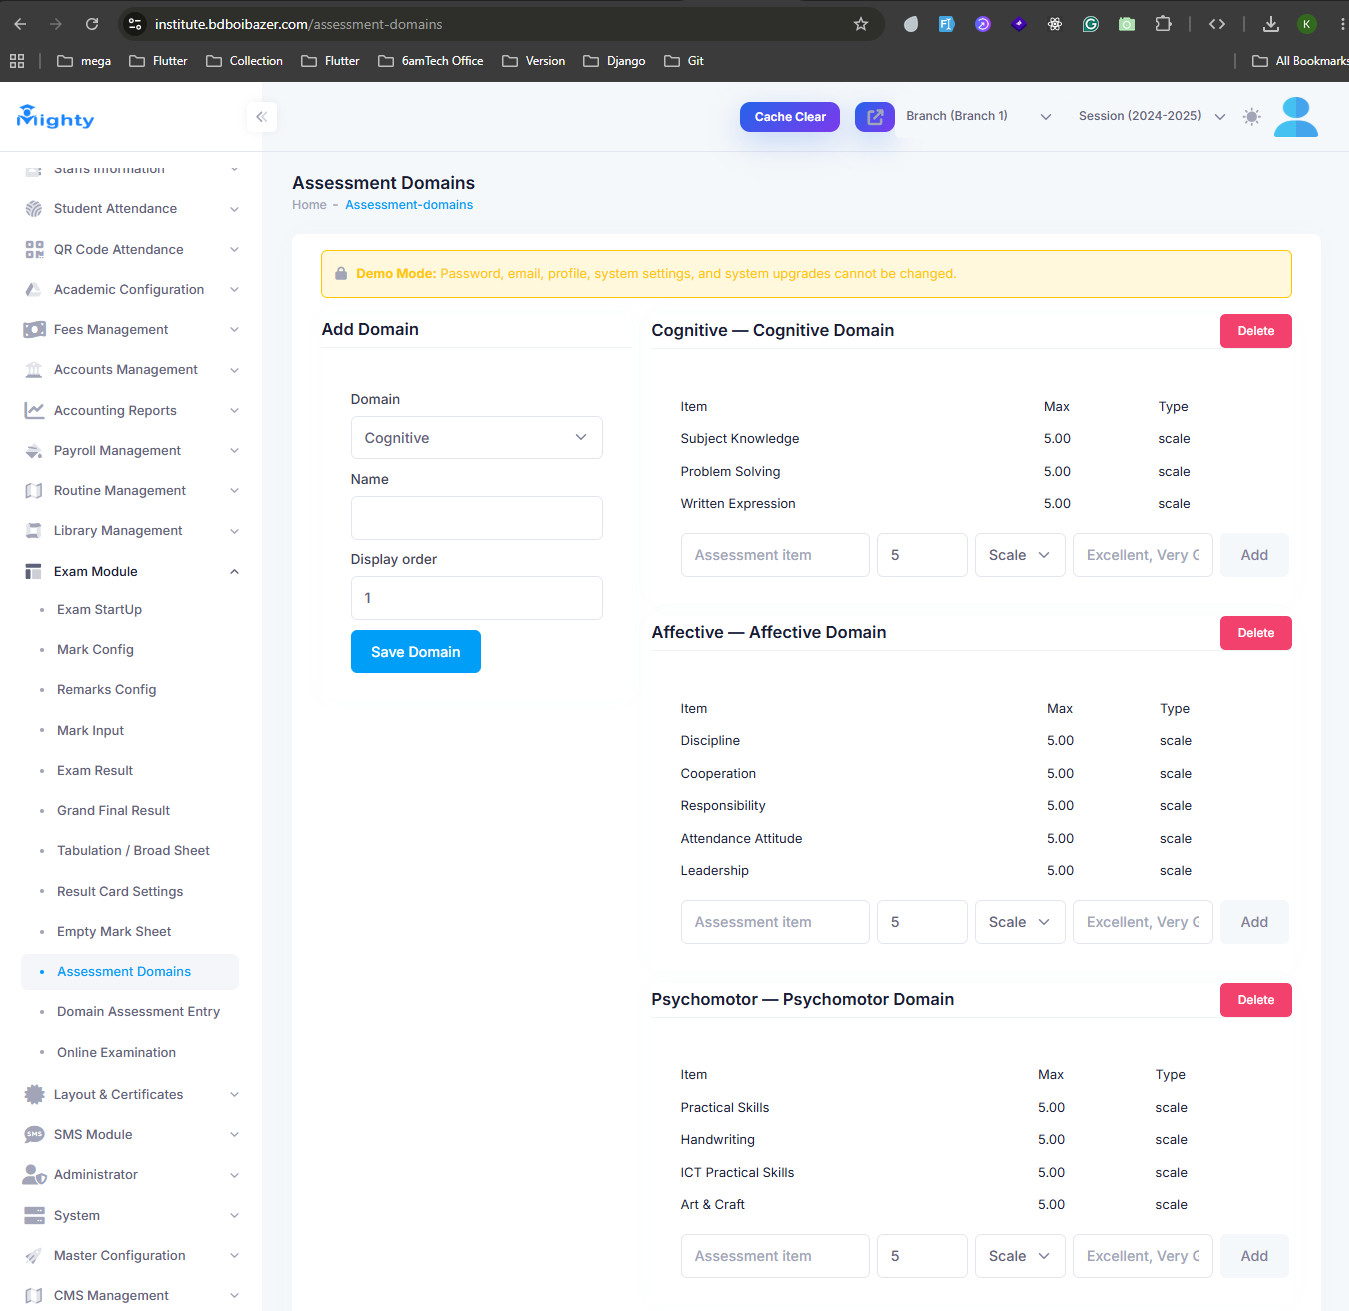
If you use domain-based (cognitive/affective/psychomotor) assessment alongside written marks,
configure the domains first under Assessment Domains — each domain (e.g.
Cognitive, Affective, Psychomotor) has its own list of scored items such as Subject Knowledge,
Discipline, or Handwriting.
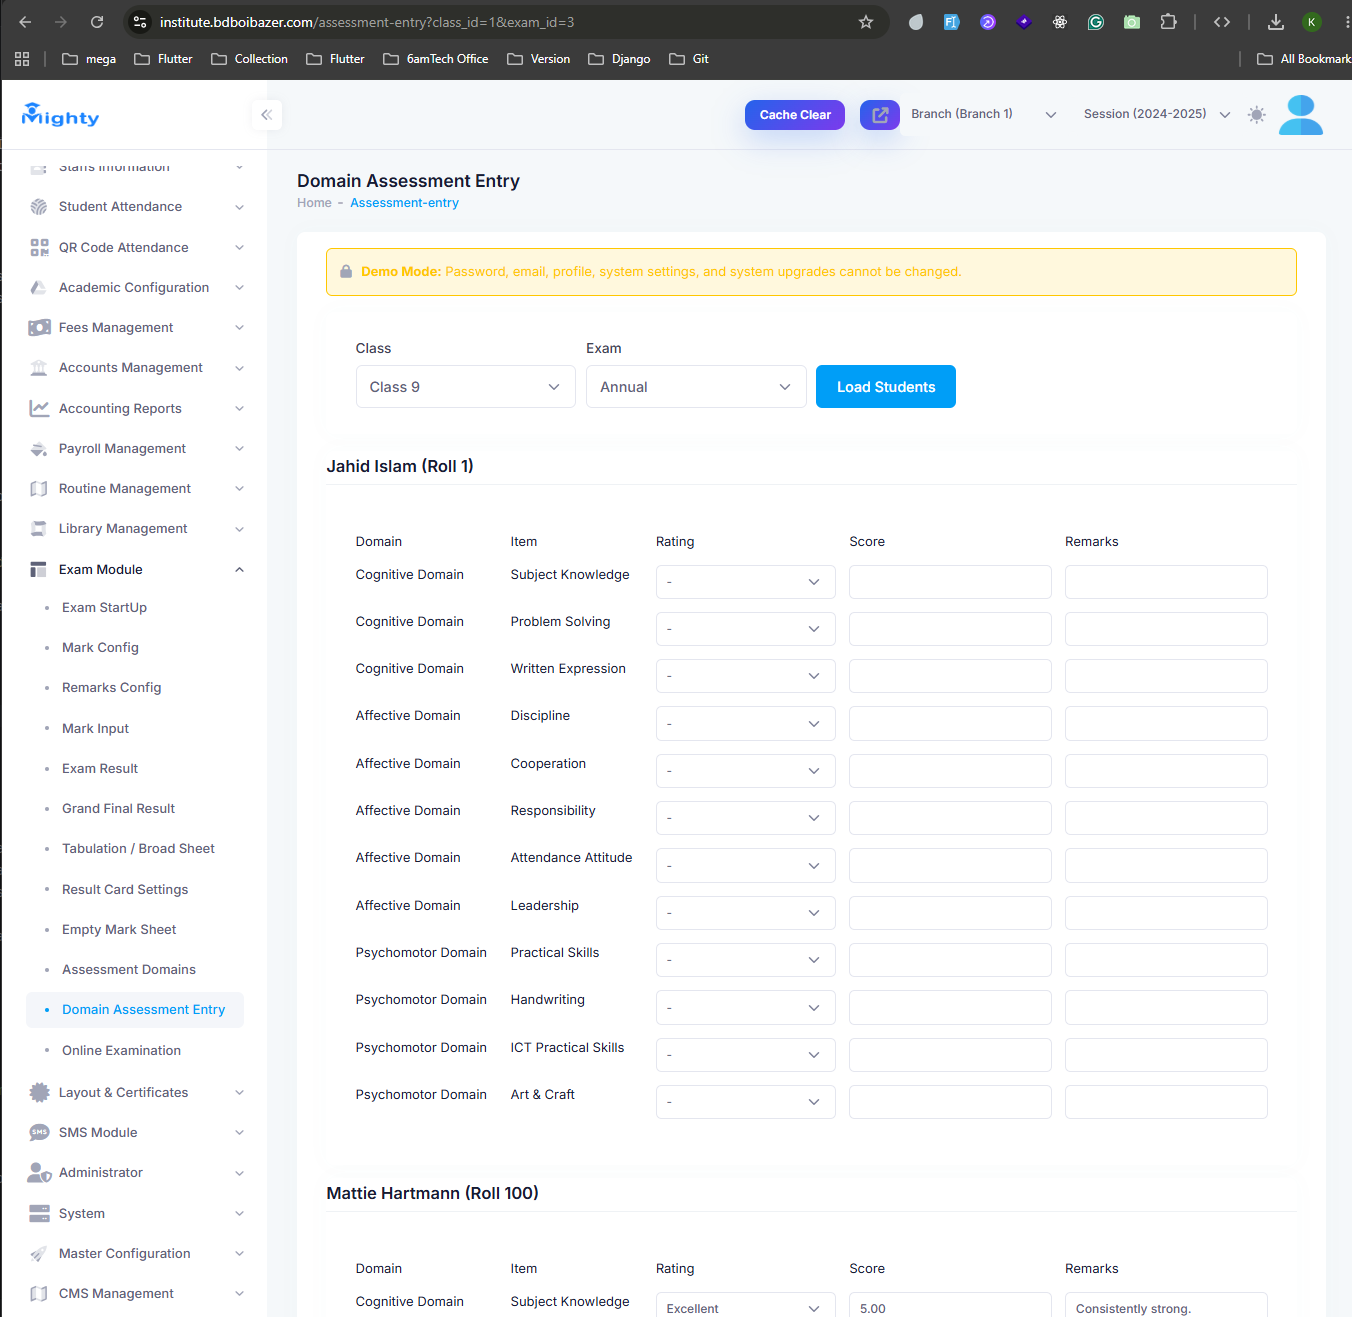
Then use Domain Assessment Entry to select a class and exam, load the student
list, and rate each student on every domain item with a Rating, Score, and optional Remarks.
Enter Marks & Publish Results
- Use Mark Config and Remarks Config to define how marks map to grades and remarks, then enter written/MCQ marks under Mark Input (or print a blank Empty Mark Sheet for manual collection).
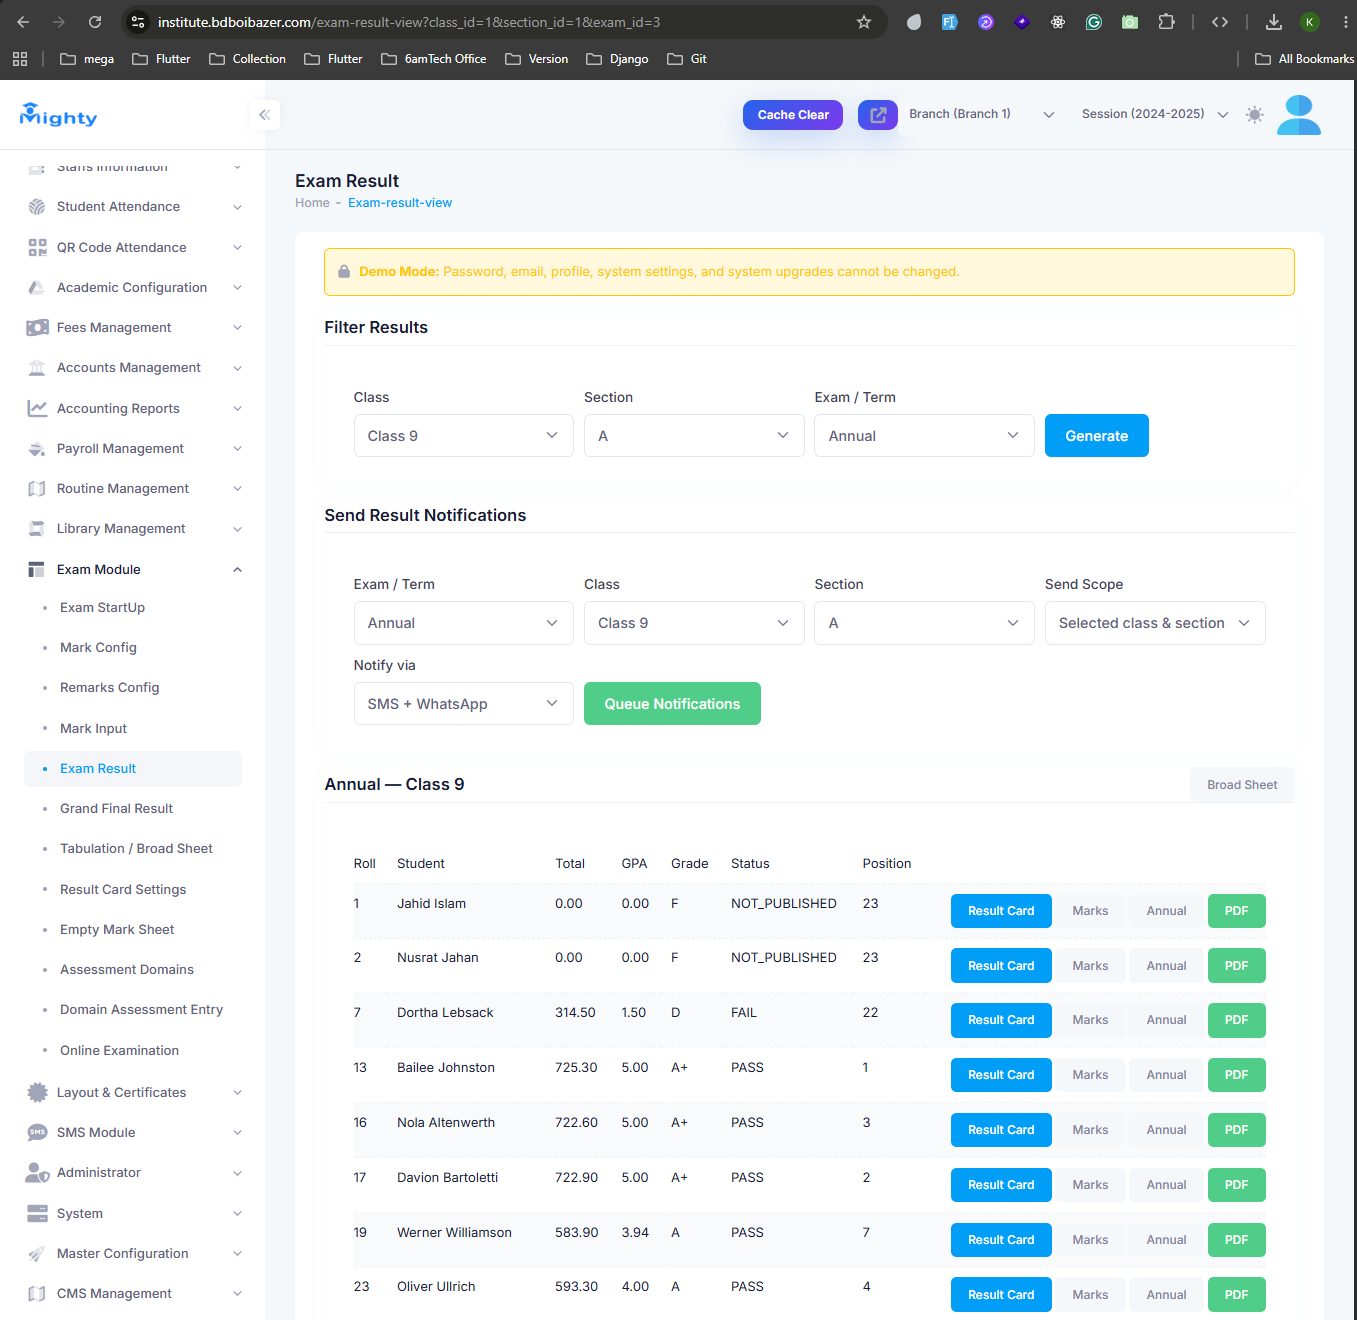
- Open Exam Result, filter by Class, Section, and Exam/Term, and click Generate to see each student's Total, GPA, Grade, Status, and Position.
- To notify parents and students once results are ready, set the Send Scope and delivery channel (SMS, WhatsApp, or both) under Send Result Notifications and click Queue Notifications.
Grand Final Result & Tabulation Sheet
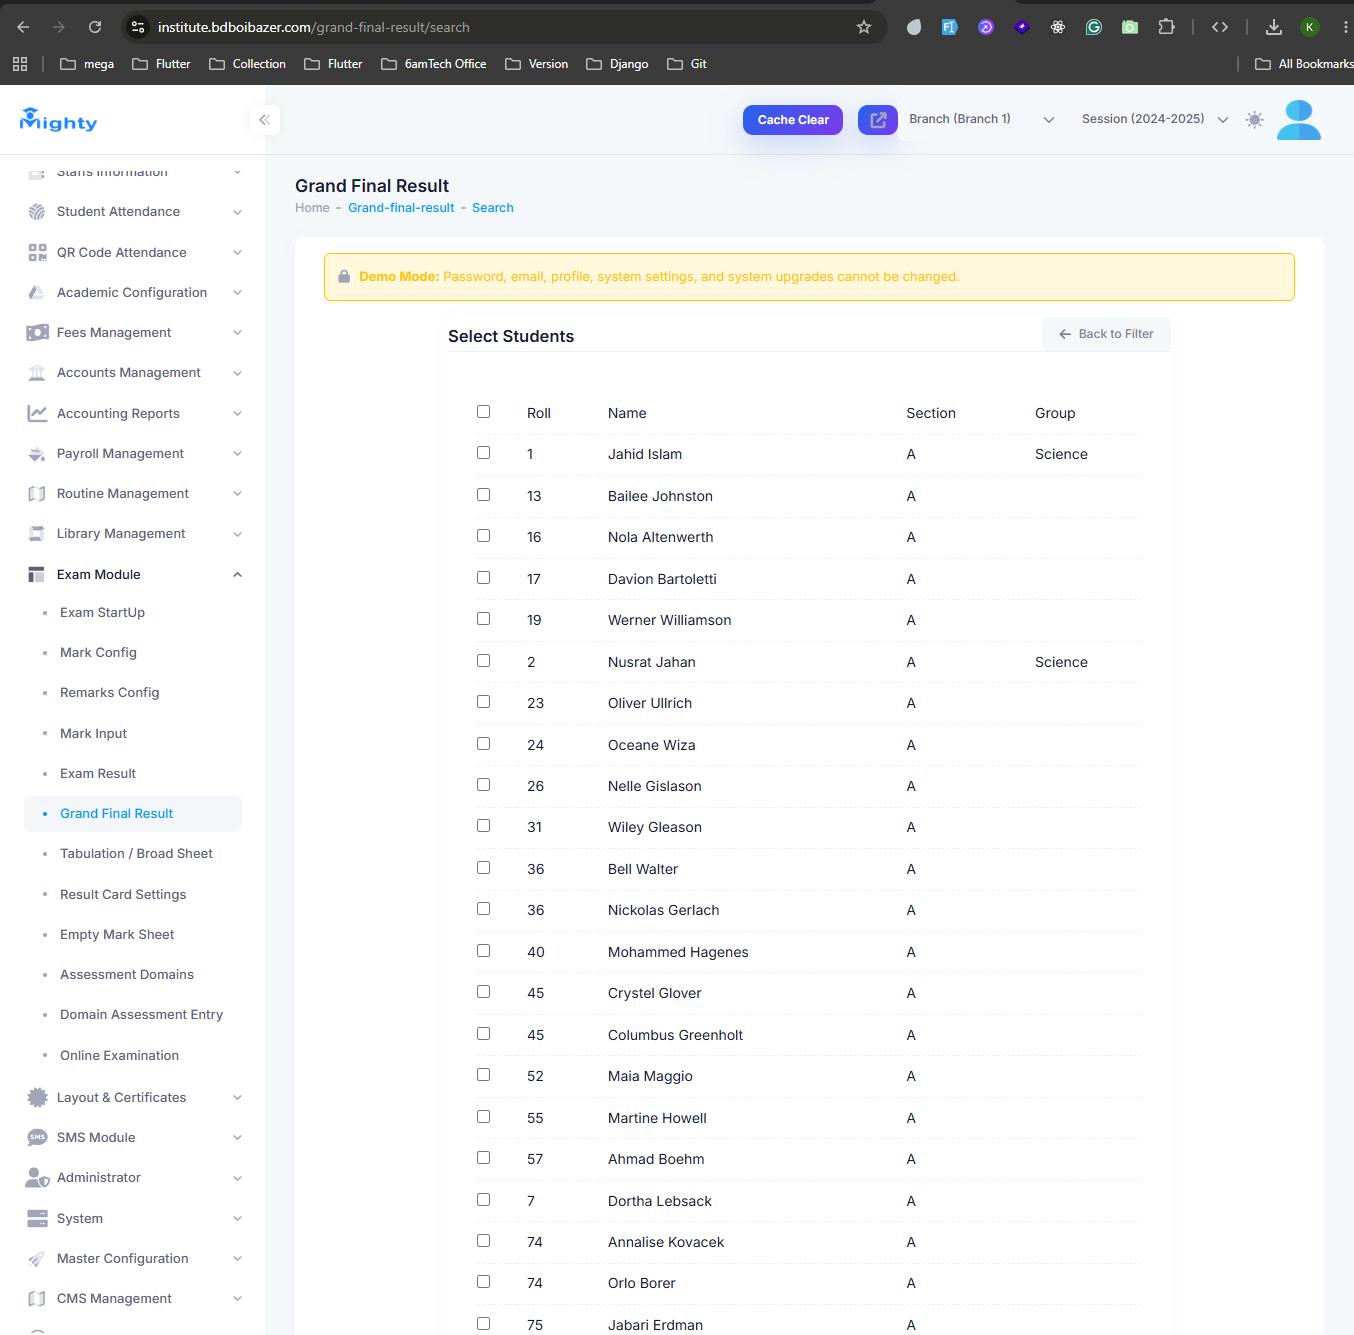
- Navigate to Grand Final Result to combine results across multiple exams/terms into one final result. Select the students to include and continue to generate it.
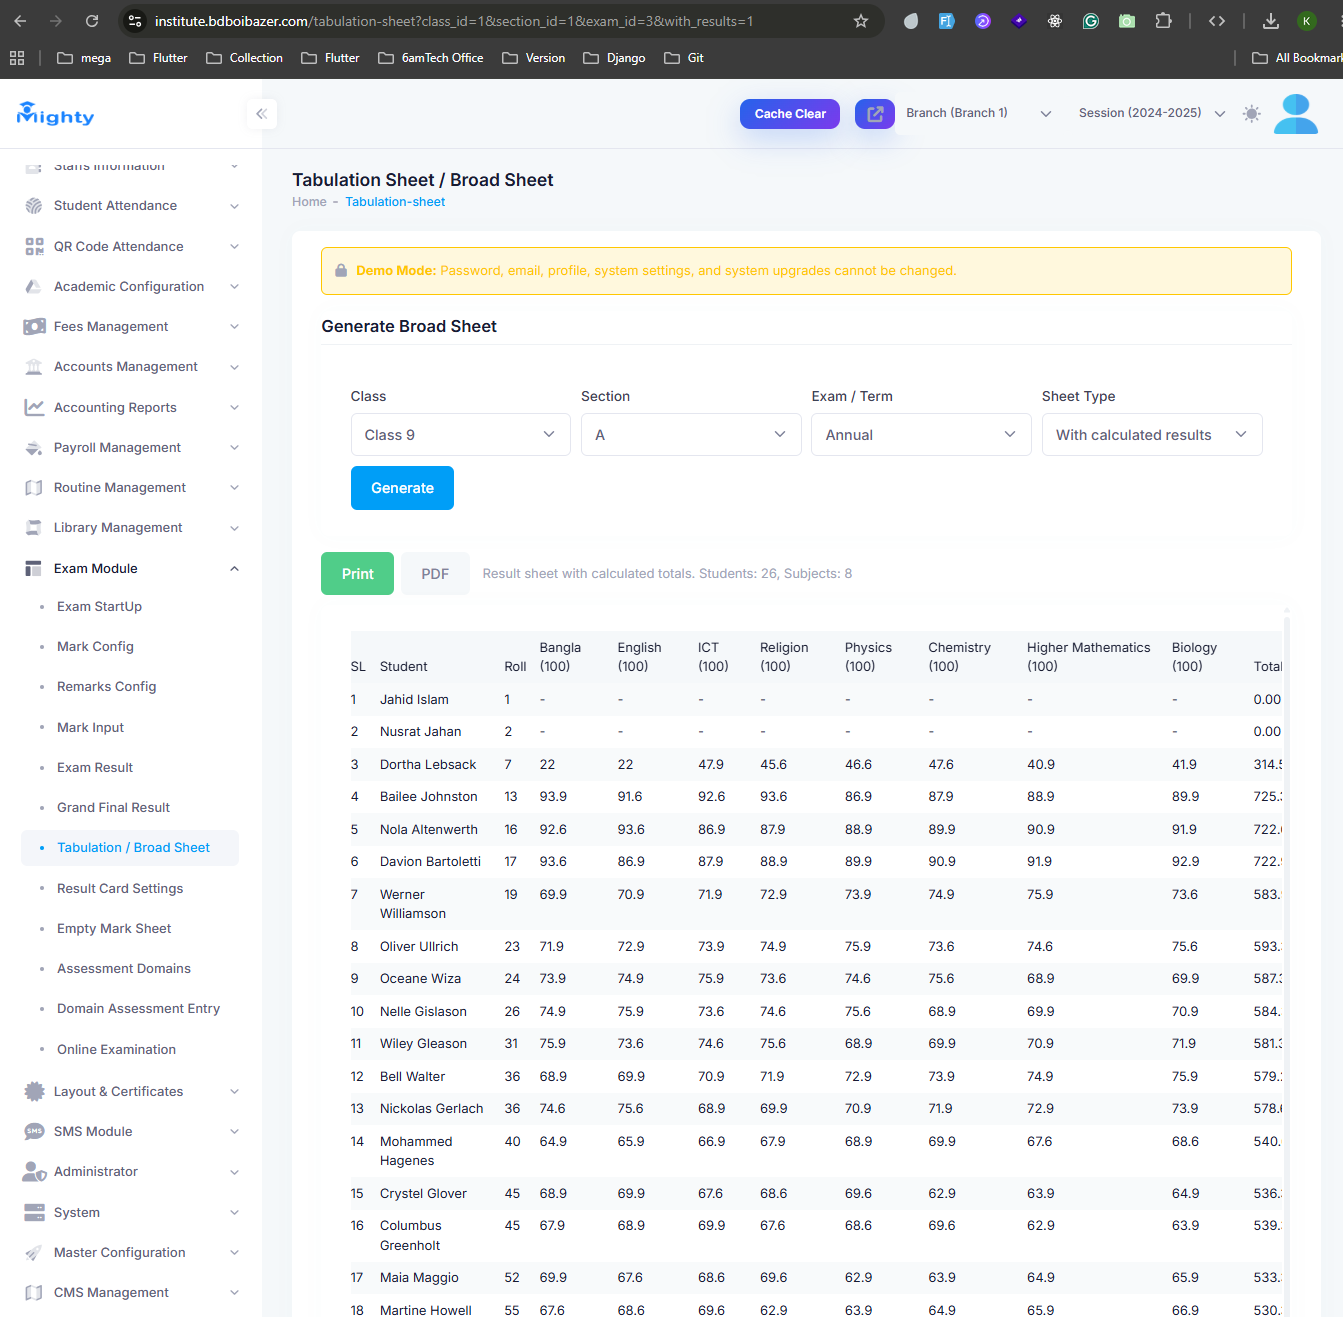
- Open Tabulation / Broad Sheet, choose a Class, Section, Exam/Term, and Sheet Type, then click Generate to view a subject-by-subject mark sheet for the whole class. Use Print or PDF to export it.
Result Cards & Admit Cards
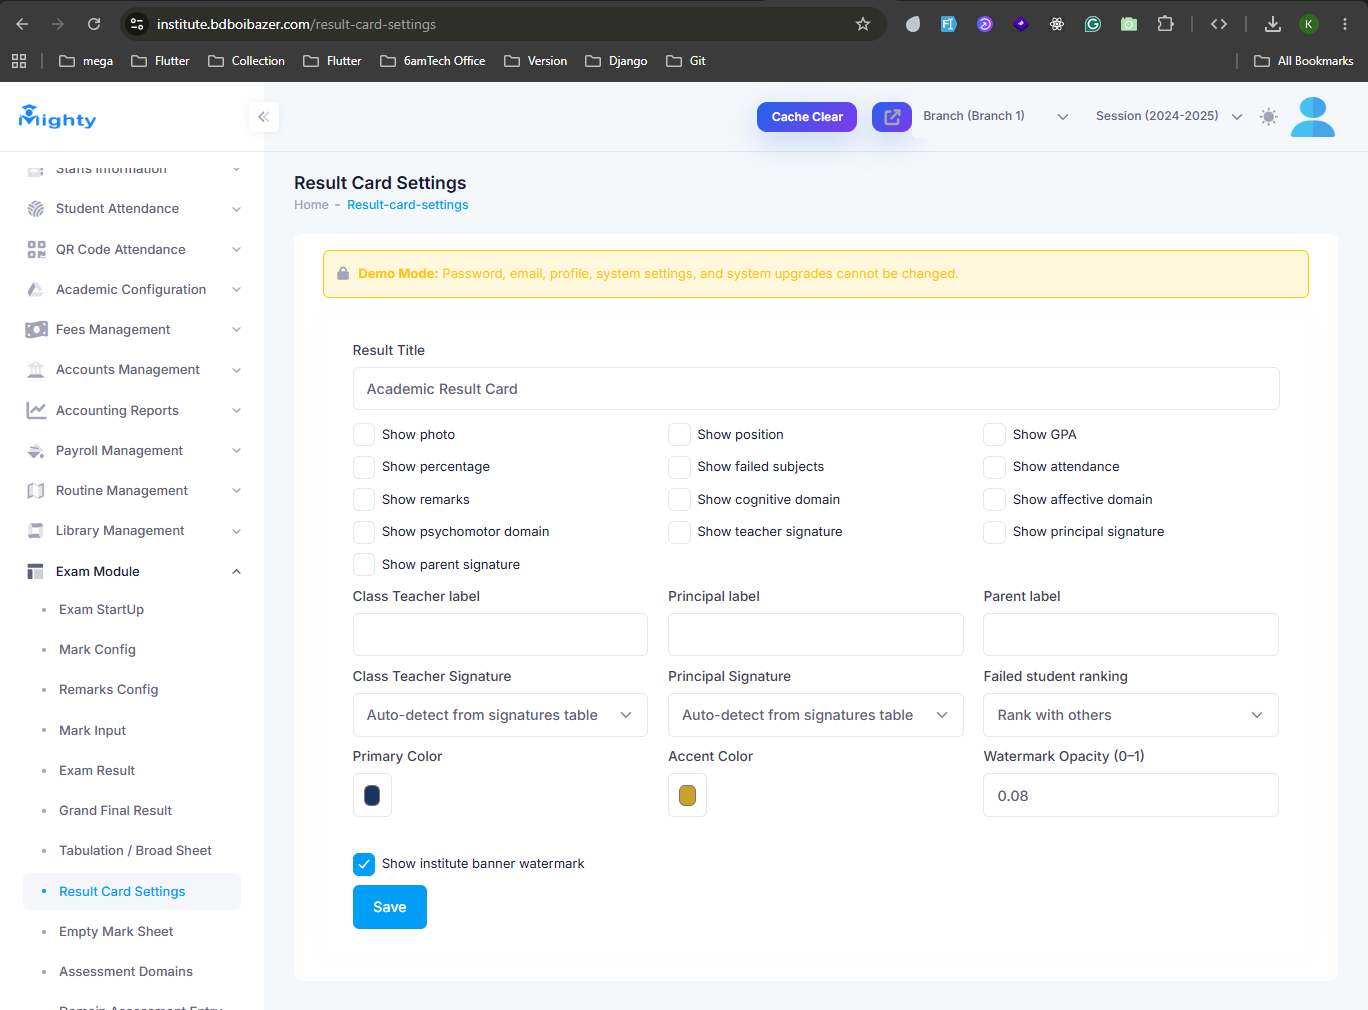
- Before printing individual result cards, open Result Card Settings to choose which fields appear (photo, percentage, GPA, attendance, signatures, and more) and set the card's title, labels, and color scheme.
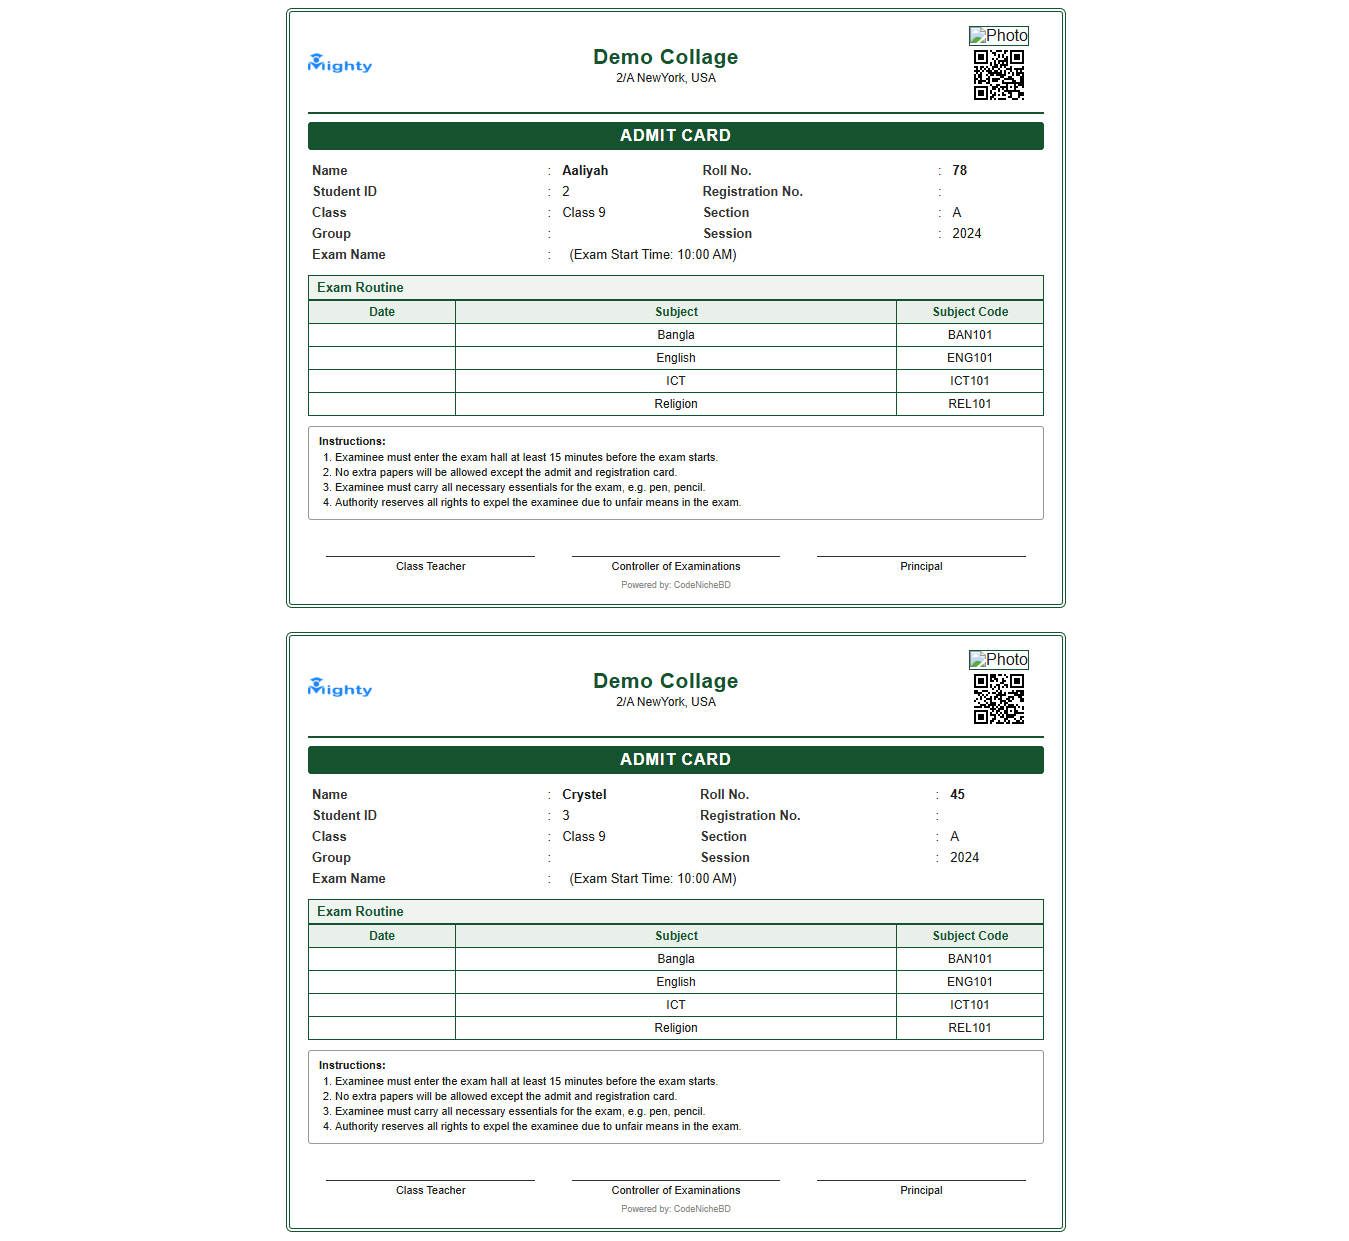
- Admit cards for each student — with their photo, subject/exam-code table, and exam instructions — can be generated and printed from Layout & Certificates or Admit & Seat Plan (under Routine Management).
Online Examination
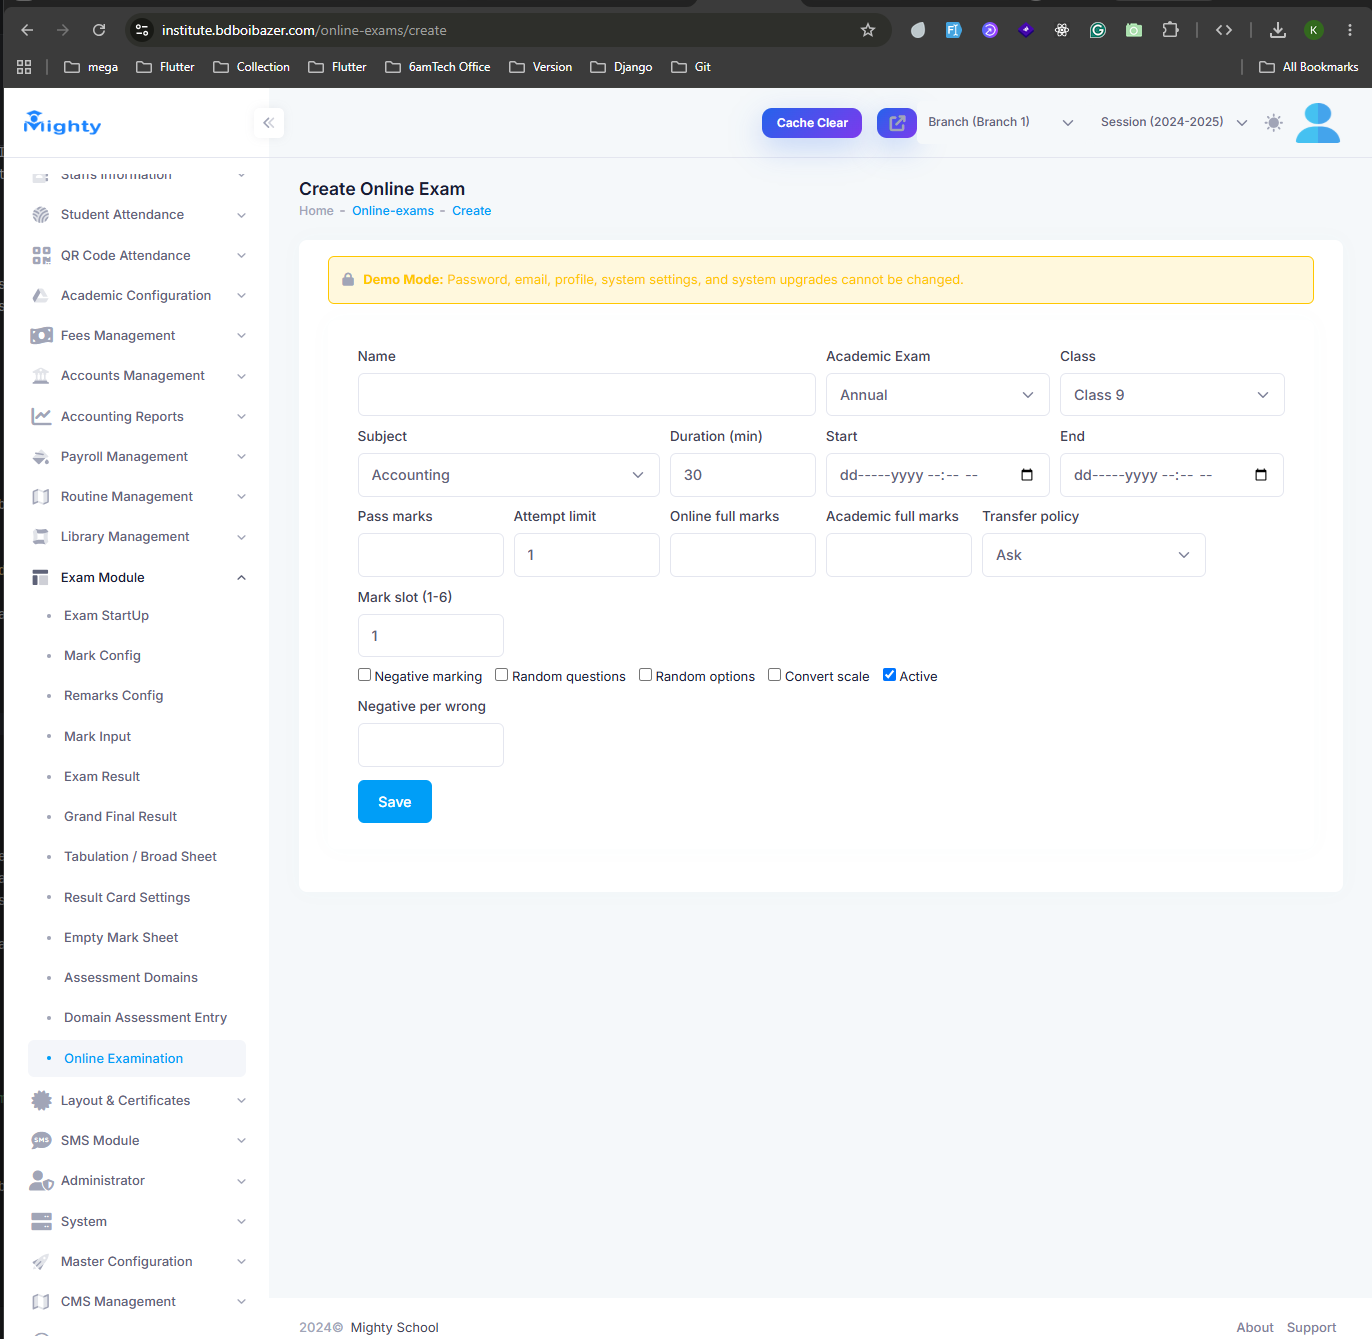
- Navigate to Exam Module → Online Examination → Create Online Exam.
- Enter the exam Name, and choose the linked Academic Exam, Class, and Subject. Set the Duration, Start/End window, Pass marks, Attempt limit, and marks, and toggle options like Negative Marking, Random Questions, or Random Options as needed.
- Click Save to publish it.
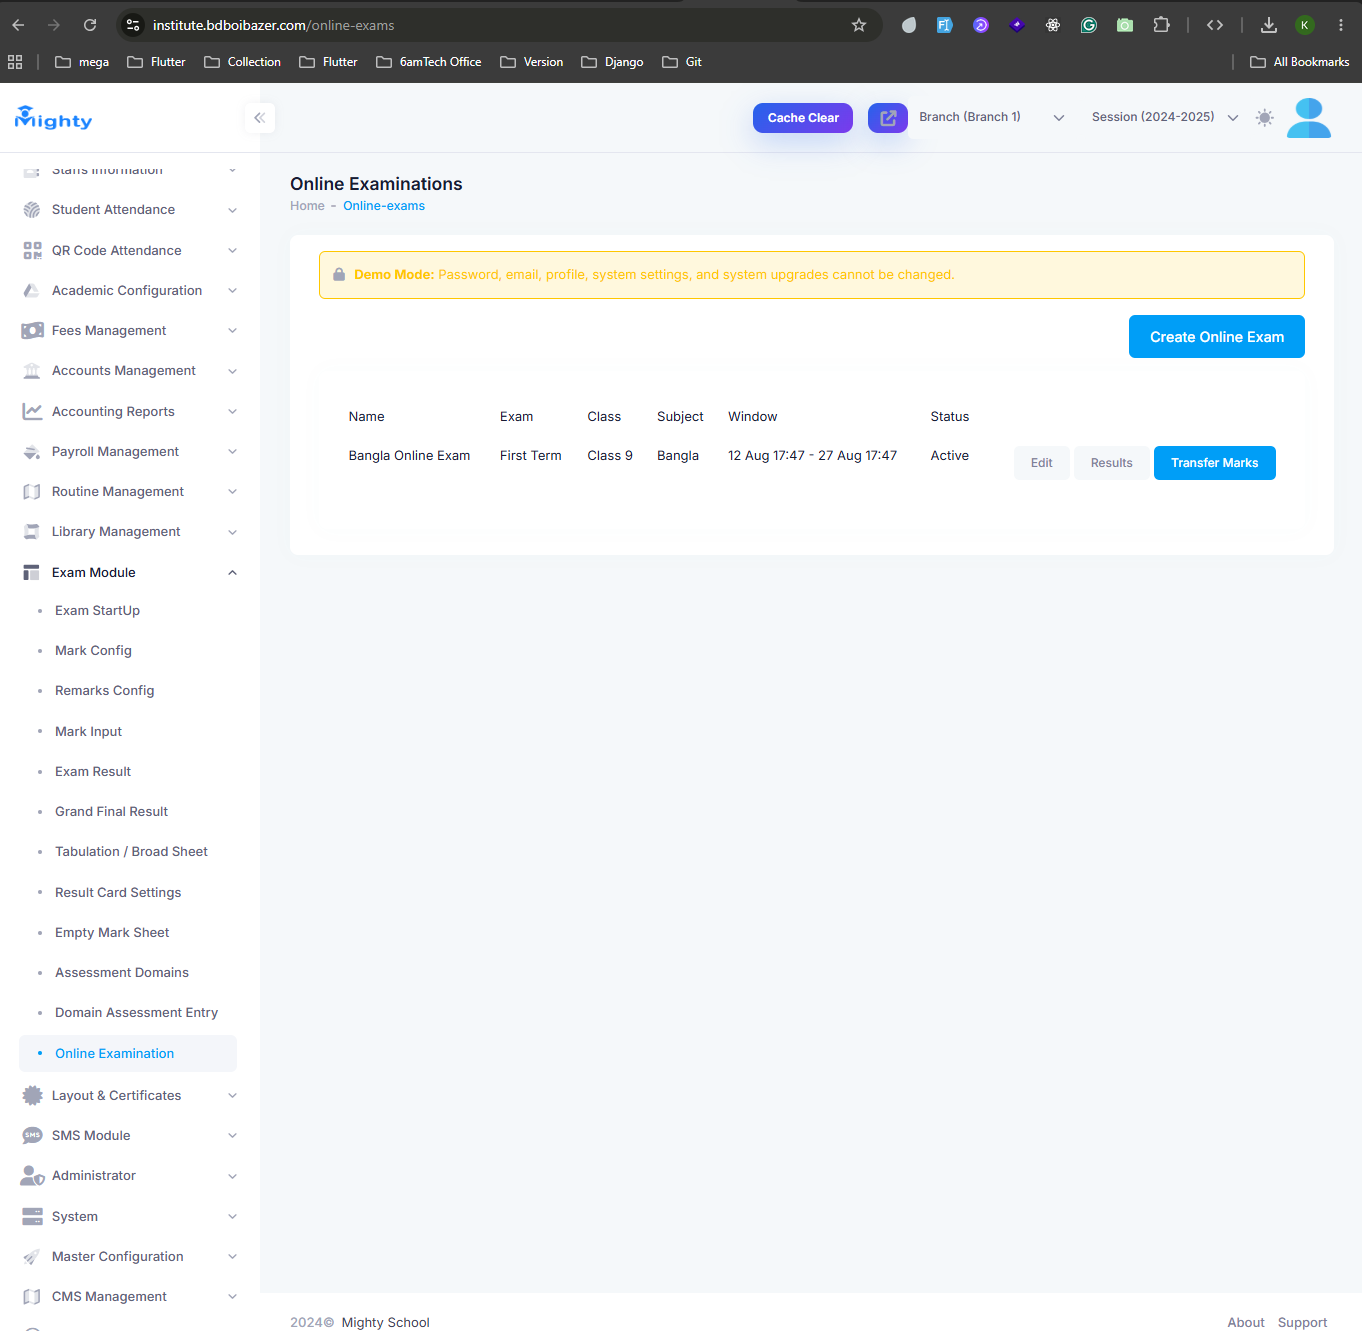
Every online exam you create is listed under Online Examinations, showing its
subject, class, active window, and status, with quick links to Edit,
Results, and Transfer Marks (to move online scores into the
regular mark sheet). Other utilities in this menu — Assessment Domains,
Domain Assessment Entry, and Grand Final Result — are covered
above.
Step 14: Layout & Certificates
Navigate to Layout & Certificates to design and print institute documents —
student and staff ID cards, admit cards, certificates, and other layout templates — with your
own branding, colors, and fields.
Step 15: SMS Module
Navigate to SMS Module to create SMS templates and send messages to students,
parents, or staff — either one-off broadcasts or messages triggered by events elsewhere in the
system, such as attendance or exam results.
Step 16: Administrator & System
Administrator manages admin user accounts and login access to the panel itself.
System holds core system configuration and maintenance tools for the
installation.
Step 17: Master Configuration
System-wide settings live under Master Configuration: System
Settings, Roles and Users (admin accounts and
permissions), Institutes and Branches (for multi-branch
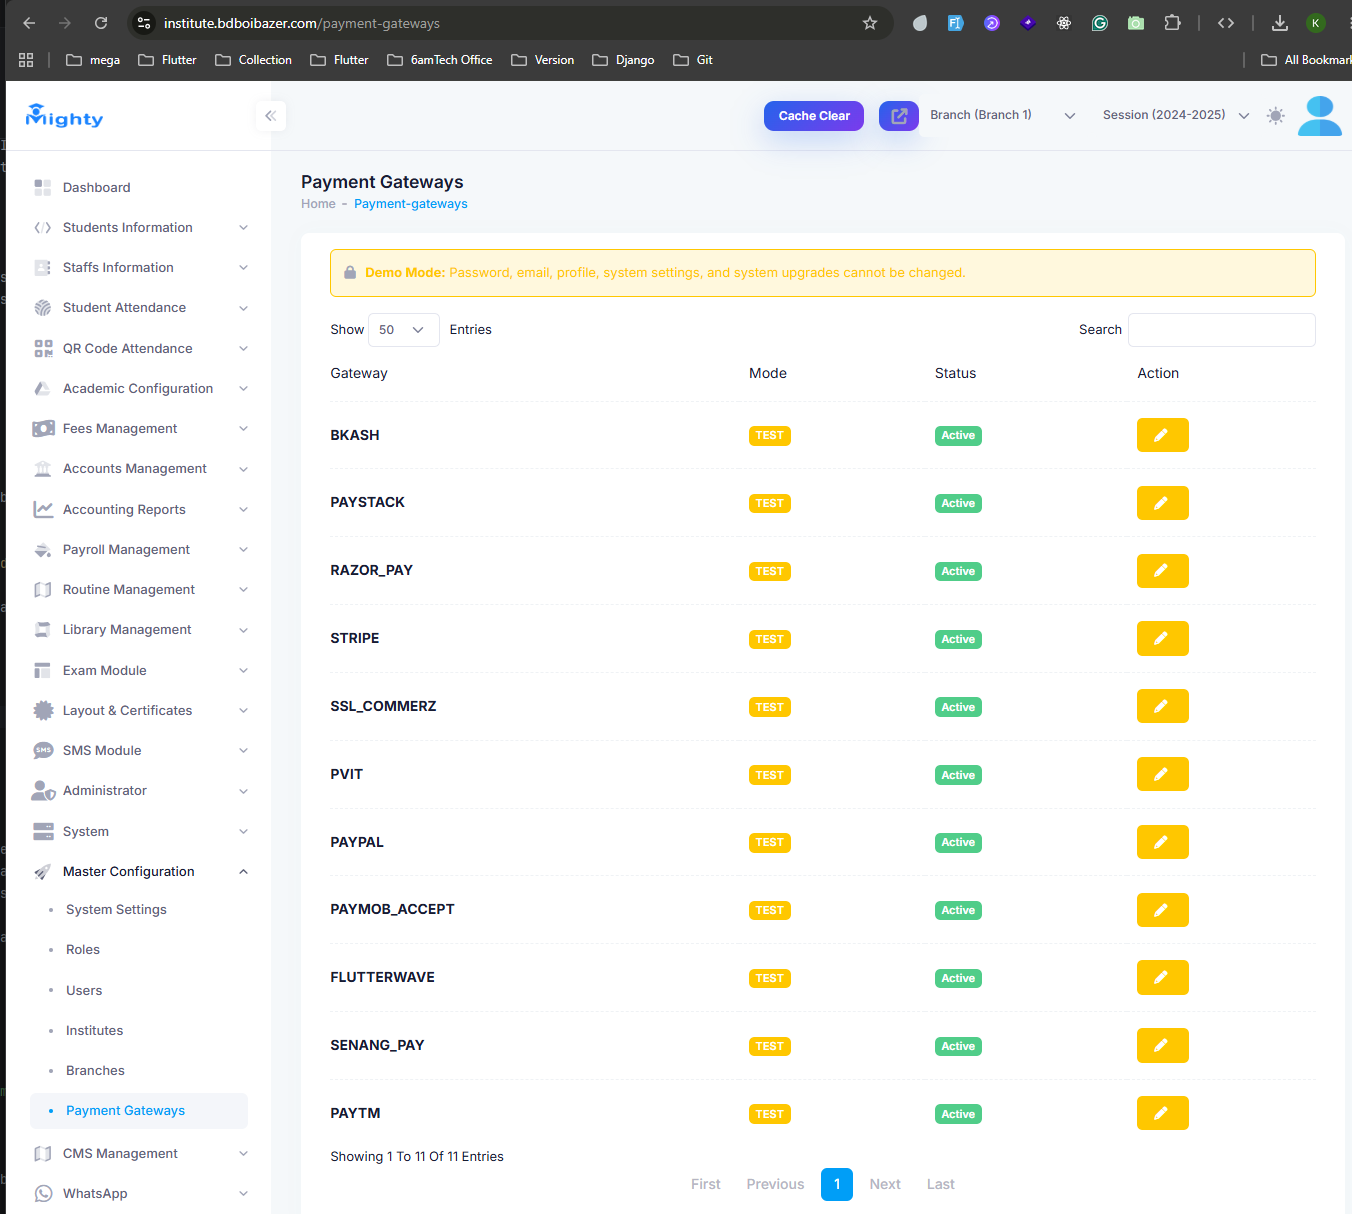
setups), and Payment Gateways, where you can enable and configure the online
payment methods available for fee collection (bKash, Stripe, PayPal, SSLCommerz, RazorPay, and
others). See Payment Gateway Setup for step-by-step credential
configuration.
Step 18: CMS Management
Navigate to CMS Management to edit the content shown on the institute's public
website — pages, news, notices, and similar content — without touching code.
Step 19: WhatsApp
Navigate to WhatsApp to configure the WhatsApp messaging integration used for
notifications such as result announcements (see Send Result Notifications in
the Exam Module above).
Step 20: Hostel Management
Navigate to Hostel Management to manage hostel rooms and beds, allocate
students to rooms, and track hostel residents.
Step 21: Transport Management
Navigate to Transport Management to manage vehicles and routes, and assign
students to a transport route/stop.
Step 22: Google Meet
Navigate to Google Meet to schedule and share online class links, letting
teachers and students join live classes directly from the panel.
Step 23: AI Assistant
Navigate to AI Assistant for in-panel help — ask questions about how to use a
feature or look up data without leaving the Admin Panel.
🔔 Notifications
Mighty School keeps everyone informed through the SMS Module and
WhatsApp integration:
- Students & Parents: Attendance alerts, exam results, fee reminders, and admit card notices
- Staff: Payroll and duty-related updates
- Administrators: System alerts and notification delivery status
Tip:
When sending result notifications, double-check the Send Scope (class/section) before clicking
Queue Notifications — messages go out to everyone in scope as soon as they're queued.